
Ask about SubPro, pilot availability, submittal workflows, review flags, and exports.
SubPro desktop app · user guide
From spec book to sent submittal, step by step
SubPro reads your project's spec book, builds the submittal log, and helps you assemble, send and track every submittal. This guide walks a new user through every screen, in the order you meet them on a real project.
Chapter 1Before you start
Five minutes of reading here saves an hour later. SubPro has one job: turn the spec book into a submittal log you can trust, then carry each submittal through review and closeout.
What SubPro does
- Reads the spec book. You upload the PDF. SubPro finds every required submittal in every CSI division and lists them as rows, each linked to the page it came from.
- Builds the log. Rows carry the spec section, the submittal type, the specified manufacturers and products, and a confidence score.
- Assembles the submittal. For any row, SubPro prints a transmittal cover on your letterhead, merges your cut sheets and any manufacturer documents it found, and gives you one PDF.
- Sends and tracks. Email the PDF from inside SubPro, log the reviewer's response, and watch days out, resubmittals and closeout dates.
What you need
- A Windows 10 or 11 computer and the SubPro installer from your welcome email.
- Your SubPro API key. It starts with sk_live_ and is in the same email.
- The project's spec book as a PDF. Books of several hundred pages are normal.
- Your company's transmittal sheet or letterhead as a one page PDF. You set this up once.
How to read this guide.Each numbered step tells you one thing to do. The picture under it shows the screen with numbered markers. The list under the picture explains each marker.
Chapter 2Install and first run
The installer puts SubPro on your computer and runs a two step setup the first time you open it.
-
Run the installer and follow the three screens.
The file is named SubPro-Setup-1.0.0-pilot.exe. Accept the default folder. If your computer is missing a Microsoft runtime, the installer adds it for you. Leave Run SubPro checked on the last screen.
-
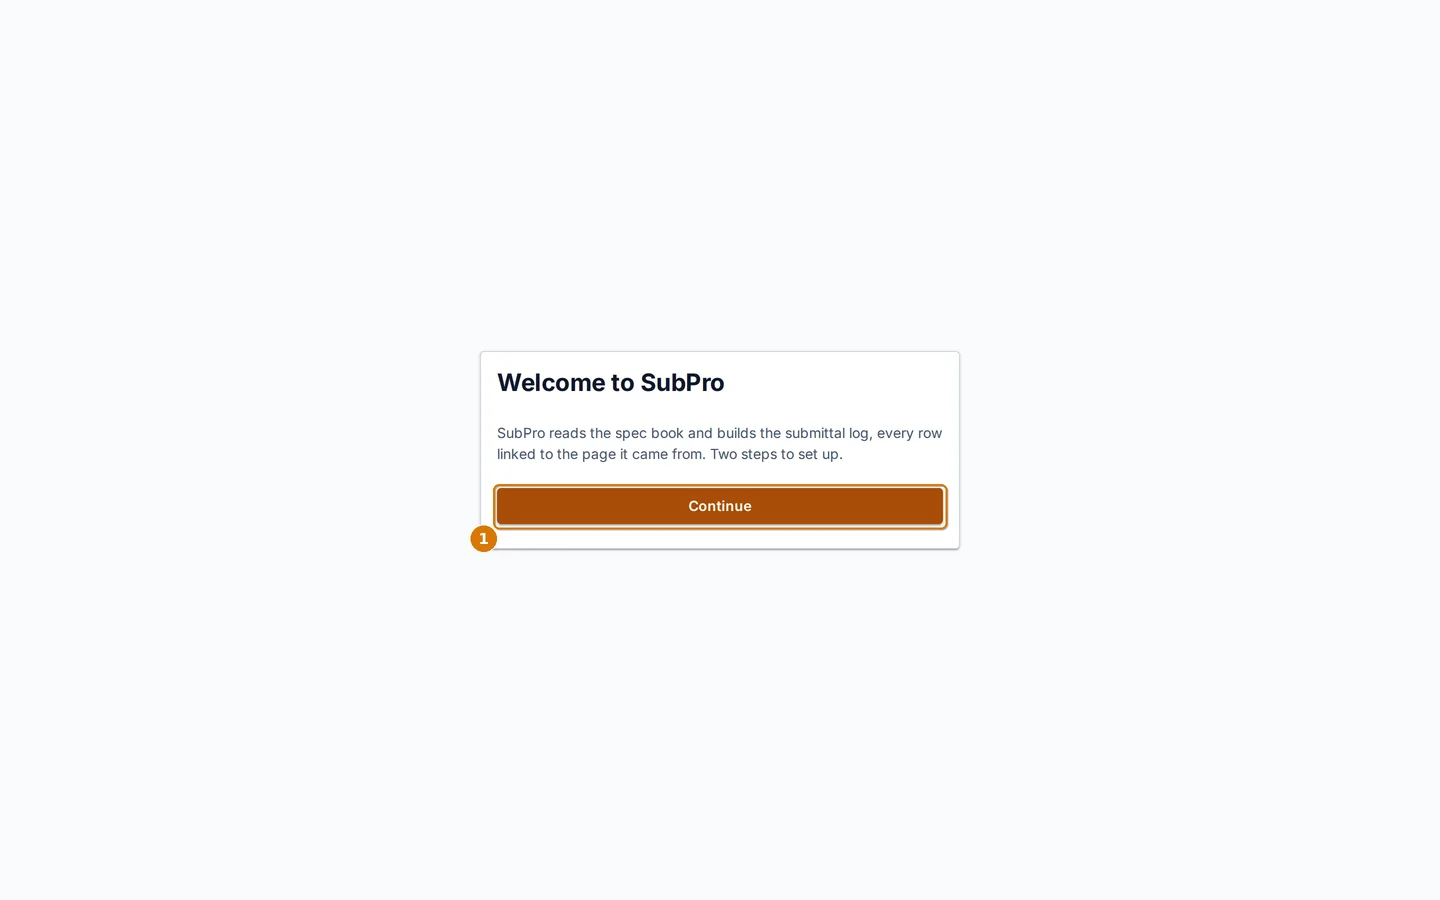
Read the welcome screen and click Continue.
 The welcome screen
- 1Continue to the next step
-
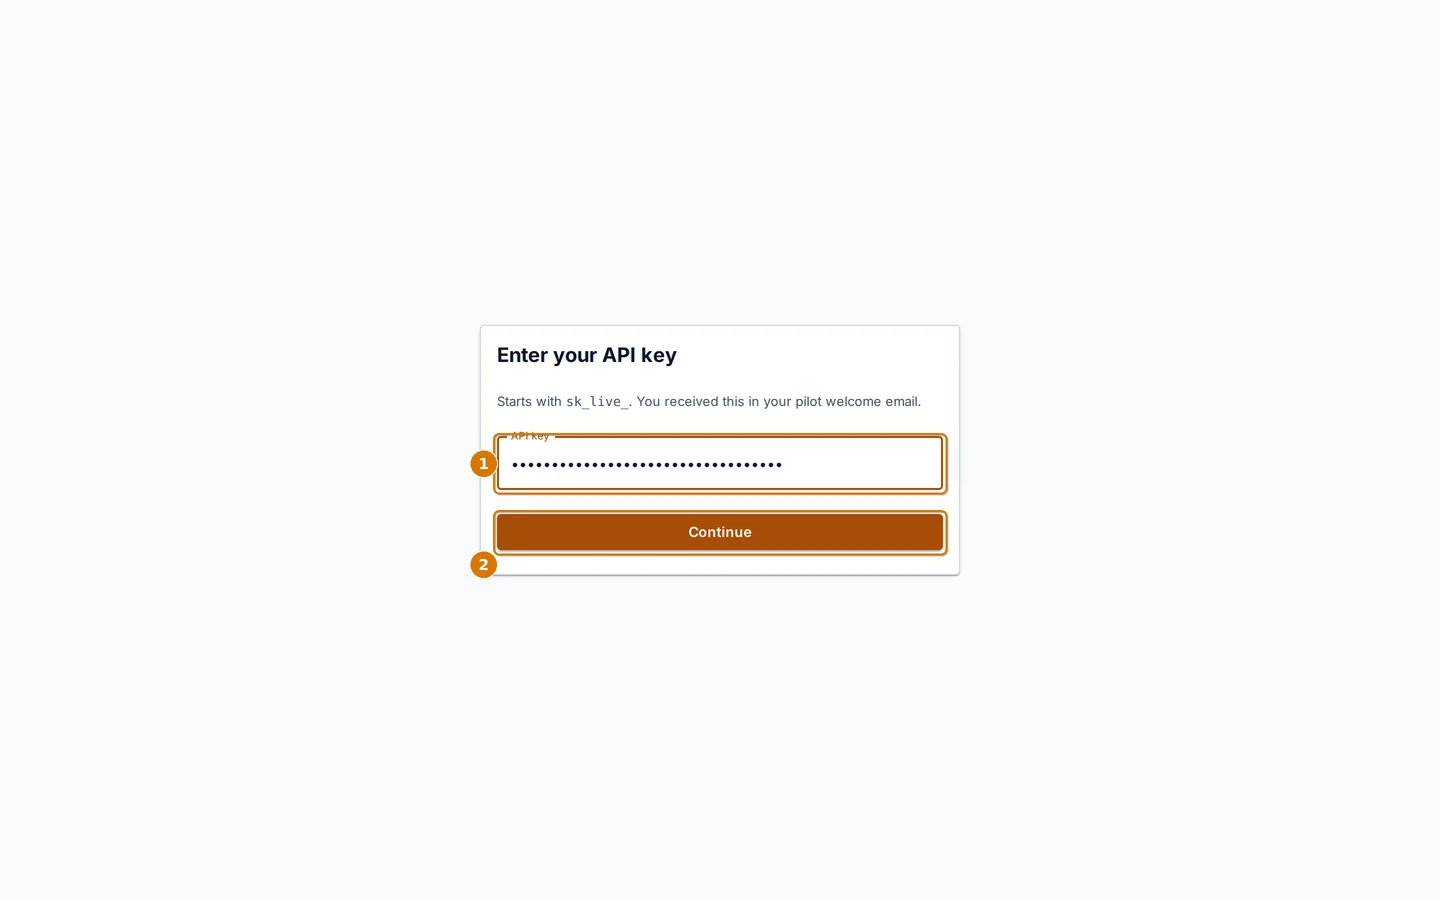
Paste your API key and click Continue.
The button stays gray until the key has the right shape. Paste the whole key, including the sk_live_ start.
 Enter your API key
- 1Paste the key here
- 2Continue turns orange once the key looks right
-
Wait for the connection test.
SubPro checks the key against the SubPro service. A green check means you are in. If you see Could not connect, click Back to API key, paste the key again, and check that the computer is online.
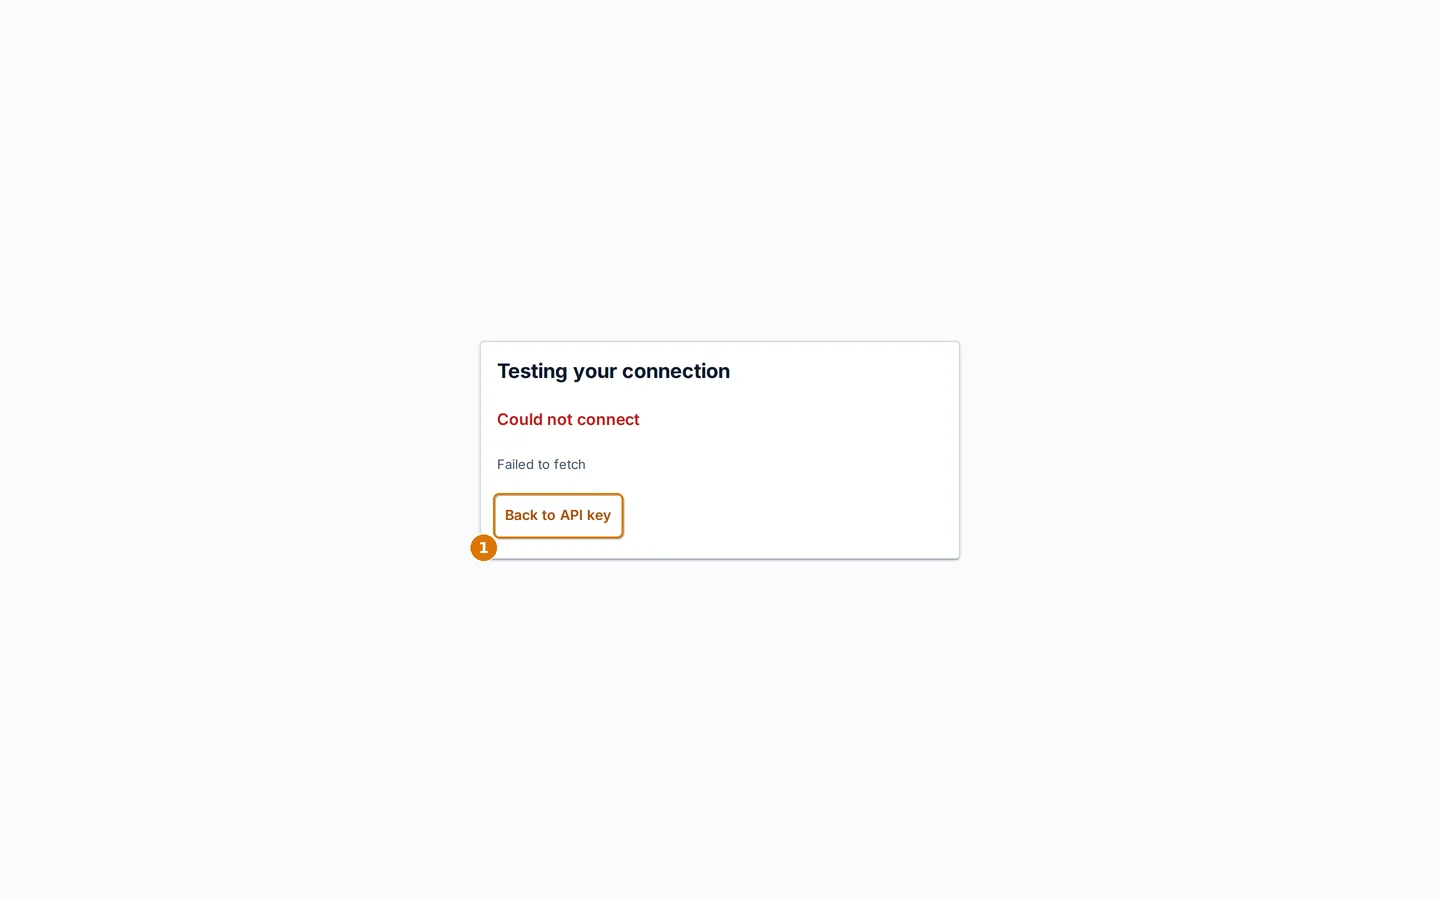 The connection test, here shown with a bad key
- 1Go back and fix the key
Where your work lives.Your projects and log stay on this computer. Spec books go to the SubPro service for reading and are deleted there when done. Rendered transmittals and submittal packages are saved under Documents\SubPro\projects.
Chapter 3Find your way around
Everything hangs off one top bar. Learn these seven controls and the six project tabs and you know the whole app.

The top bar
- 1SubPro logo. Click it to go home to All Projects
- 2Search everything (also Ctrl+K)
- 3Export the log to CSV or Excel
- 4Upload a spec book to the open project
- 5Chat about the spec book or the log
- 6Lead times table
- 7Settings
The six project tabs
Once a project is open, the tabs sit next to the project name.
| Tab | What it is for |
|---|---|
| Submittals | The log. One row per required submittal, grouped by CSI division. |
| Specs | The spec books on file for the project and any revisions. |
| Review | Everything that has been sent. Days out, responses, returned copies. The badge counts rows waiting on someone. |
| Schedule | Submit by and approval by dates worked back from the construction start. |
| Closeout | O&M manuals, warranties, training and other closeout items with their due dates. |
| Modifications | ASIs, addenda and bulletins, and the rows they touch. |
The project picker
Click the project name in the top bar to switch projects or reach the project menus.
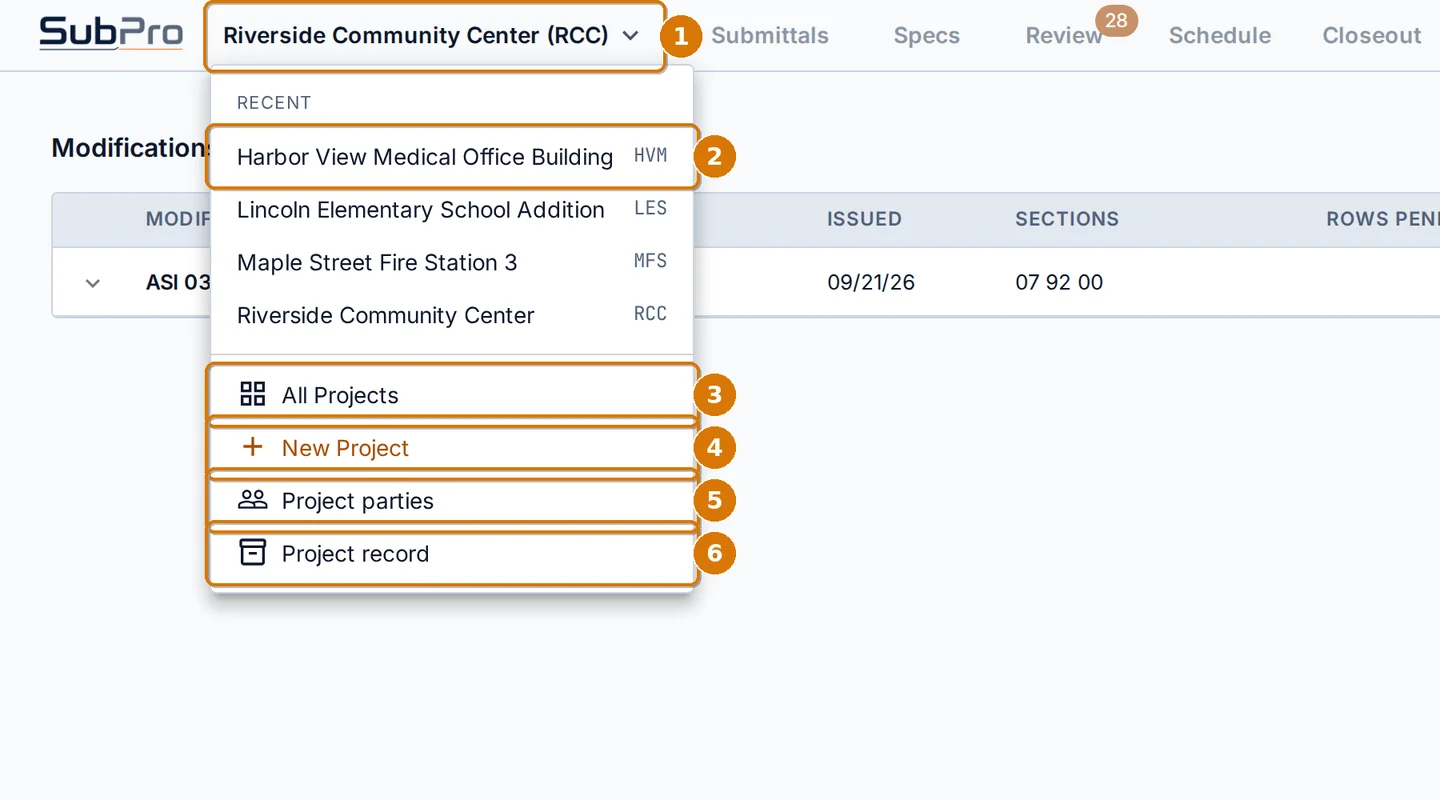
The project picker
- 1The current project. Click to open the menu
- 2Recent projects. Click one to switch
- 3Back to All Projects
- 4Start a new project
- 5Project parties (architect, owner, suppliers)
- 6Project record (contract number, award date, retention)
Light or dark
SubPro follows your Windows theme. To choose for yourself, open Settings and pick Light, Dark or System. Every screen in this guide is shown in light mode.
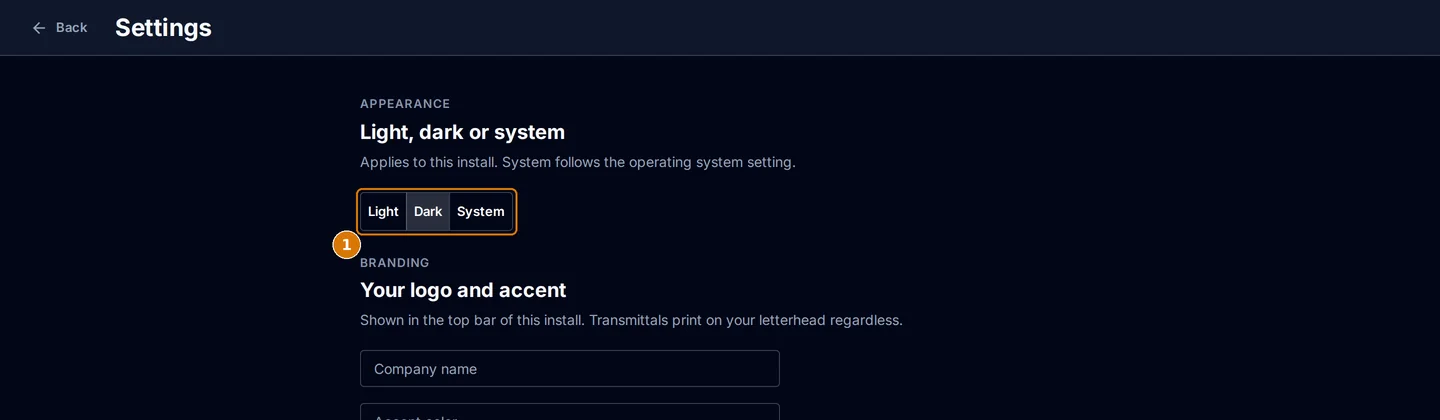
The theme control in Settings
- 1Light, Dark or System
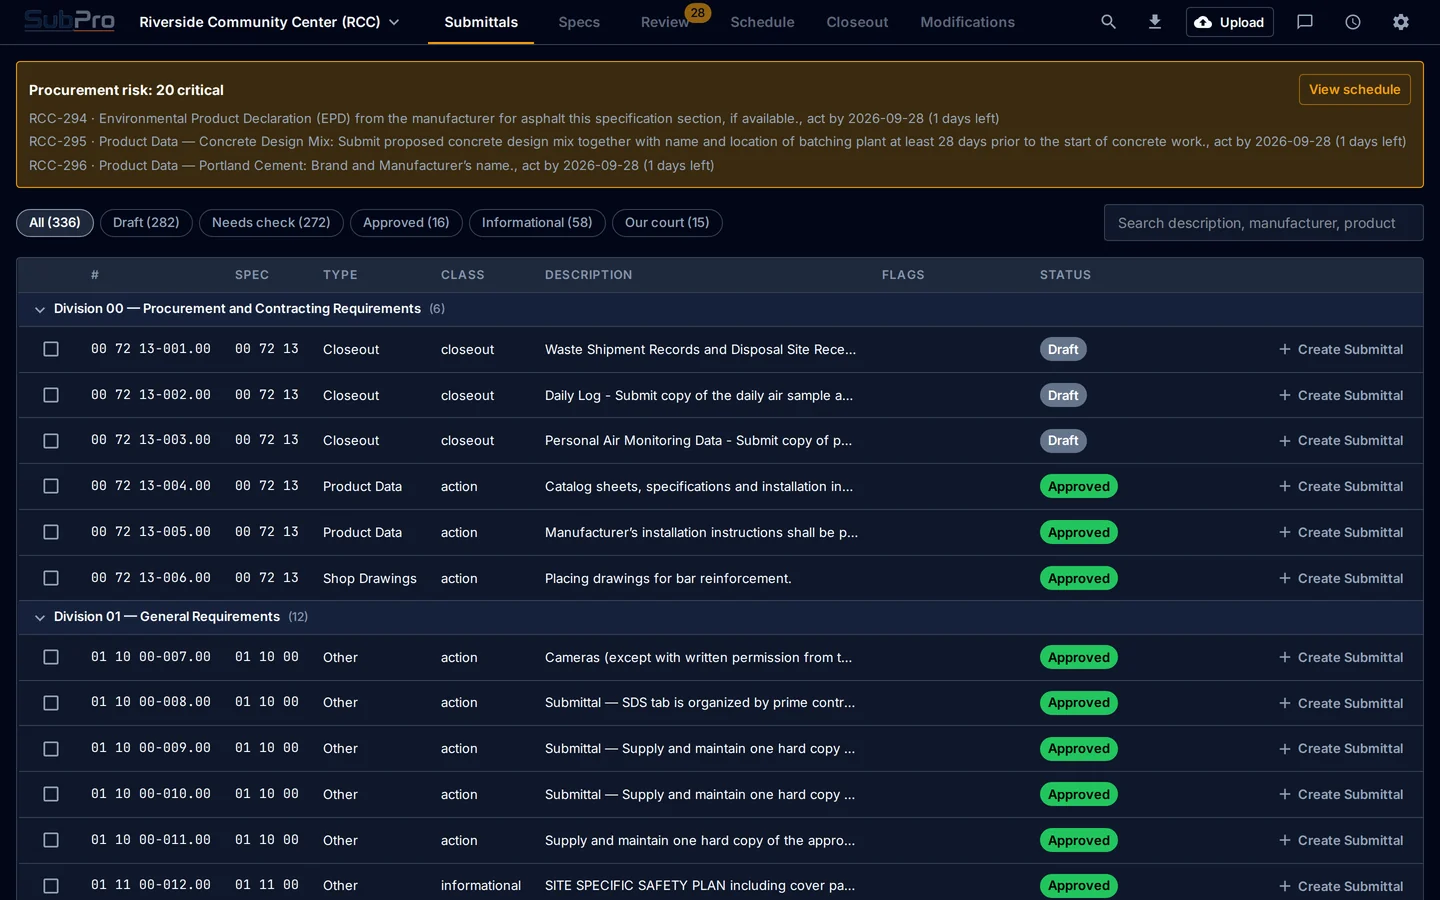
The same log in dark mode
Chapter 4All Projects, the home screen
SubPro opens here. Each row is a project and each column is a count of submittals in that state, so you see where the work is before you open anything.
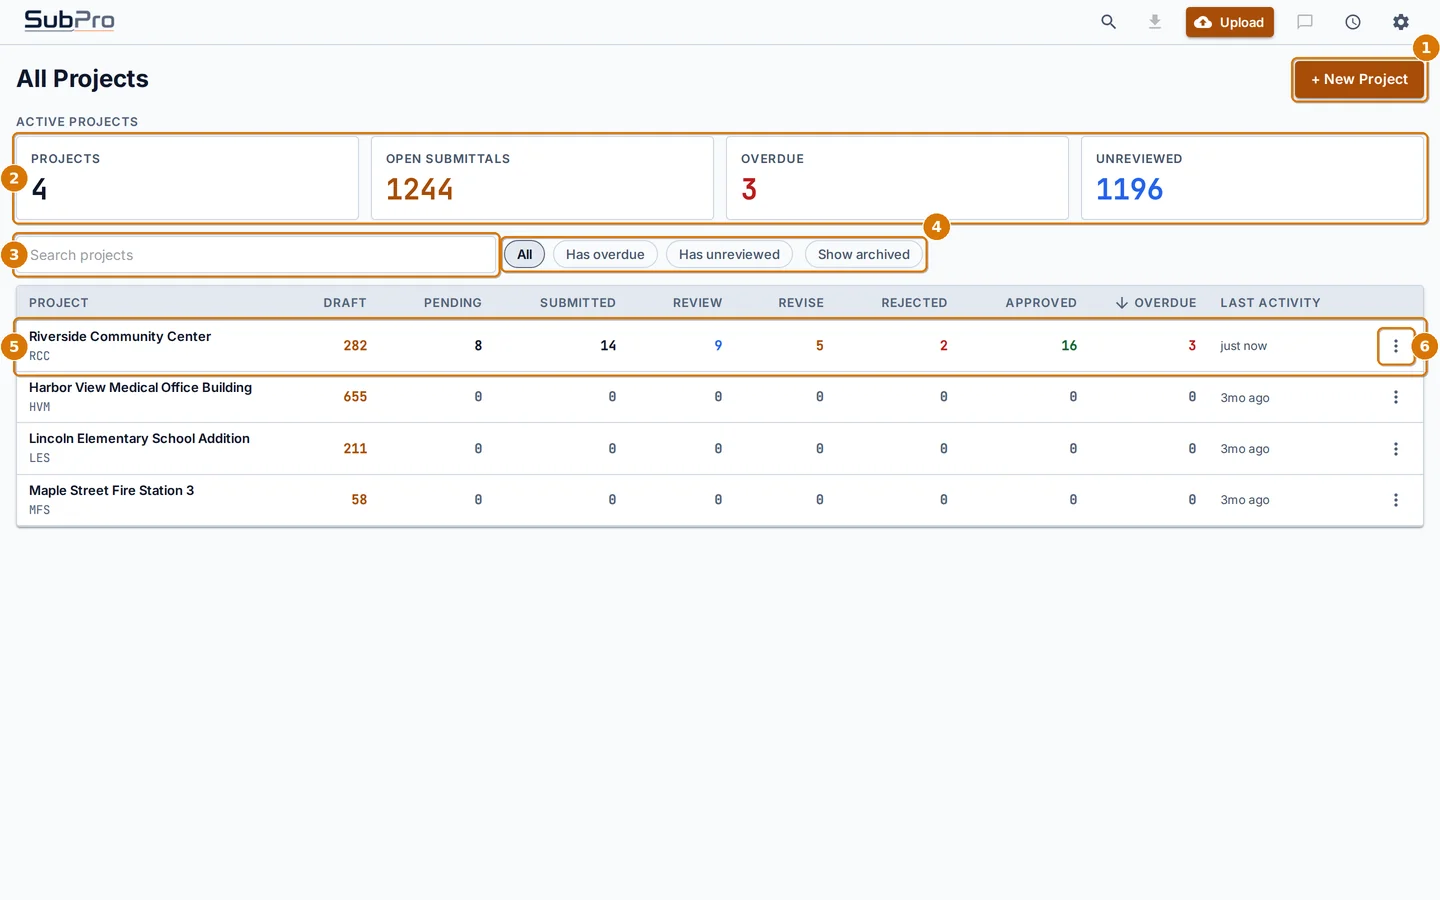
All Projects
- 1Start a new project
- 2Totals across your active projects. Click a card to filter the list
- 3Search projects by name or number
- 4Filters: all, has overdue, has unreviewed, show archived
- 5Click a row to open the project
- 6Row menu: archive or delete
Reading the counts
| Column | Meaning |
|---|---|
| Draft | Extracted or added, not yet sent. |
| Pending | Ready to send. Someone marked it ready but it has not gone out. |
| Submitted | Sent to the reviewer, no response yet. |
| Review | The reviewer confirmed receipt and is reviewing. |
| Revise | Returned revise and resubmit. |
| Rejected | Returned rejected. |
| Approved | Approved, or approved as noted. |
| Overdue | Rows past their due date that are still open. |
Archive a project
-
Click the three dots at the right end of the project's row.
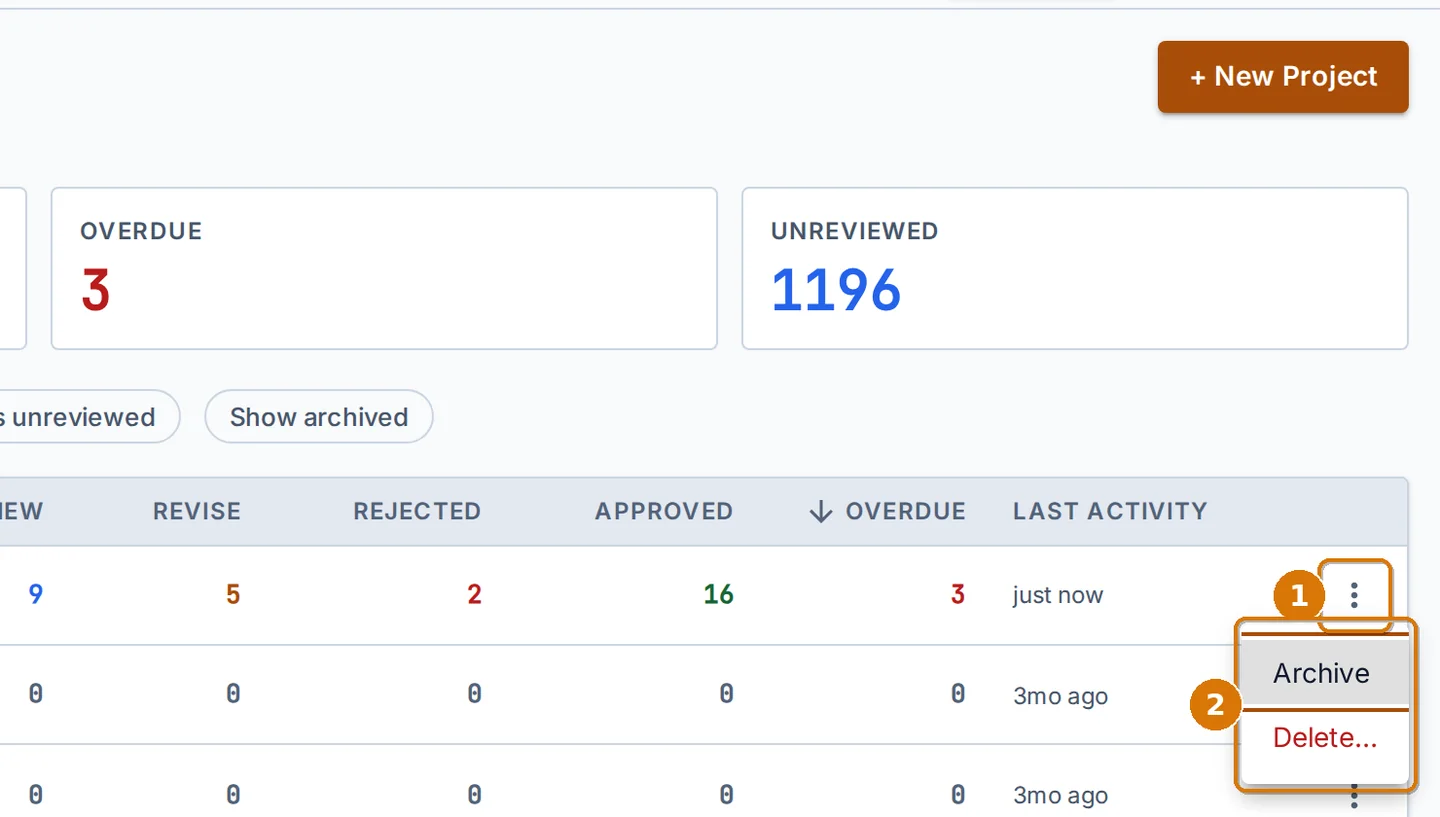 The row menu
- 1The row menu button
- 2Archive hides the project. Delete removes it for good and asks you to confirm
-
Choose Archive.
The project leaves the list and the totals. Turn on Show archived to see it again and bring it back. An undo message appears at the bottom of the screen for a few seconds.
Chapter 5Create a project
A project holds one spec book, its log, its parties and its dates. Create one before you upload anything.
-
Click + New Project on All Projects, or pick New Project in the project picker.
-
Fill in the name and number, then click Create project.
The name and number are required. The number becomes the prefix of every submittal number, so keep it short. Everything else can be added later from the project record.
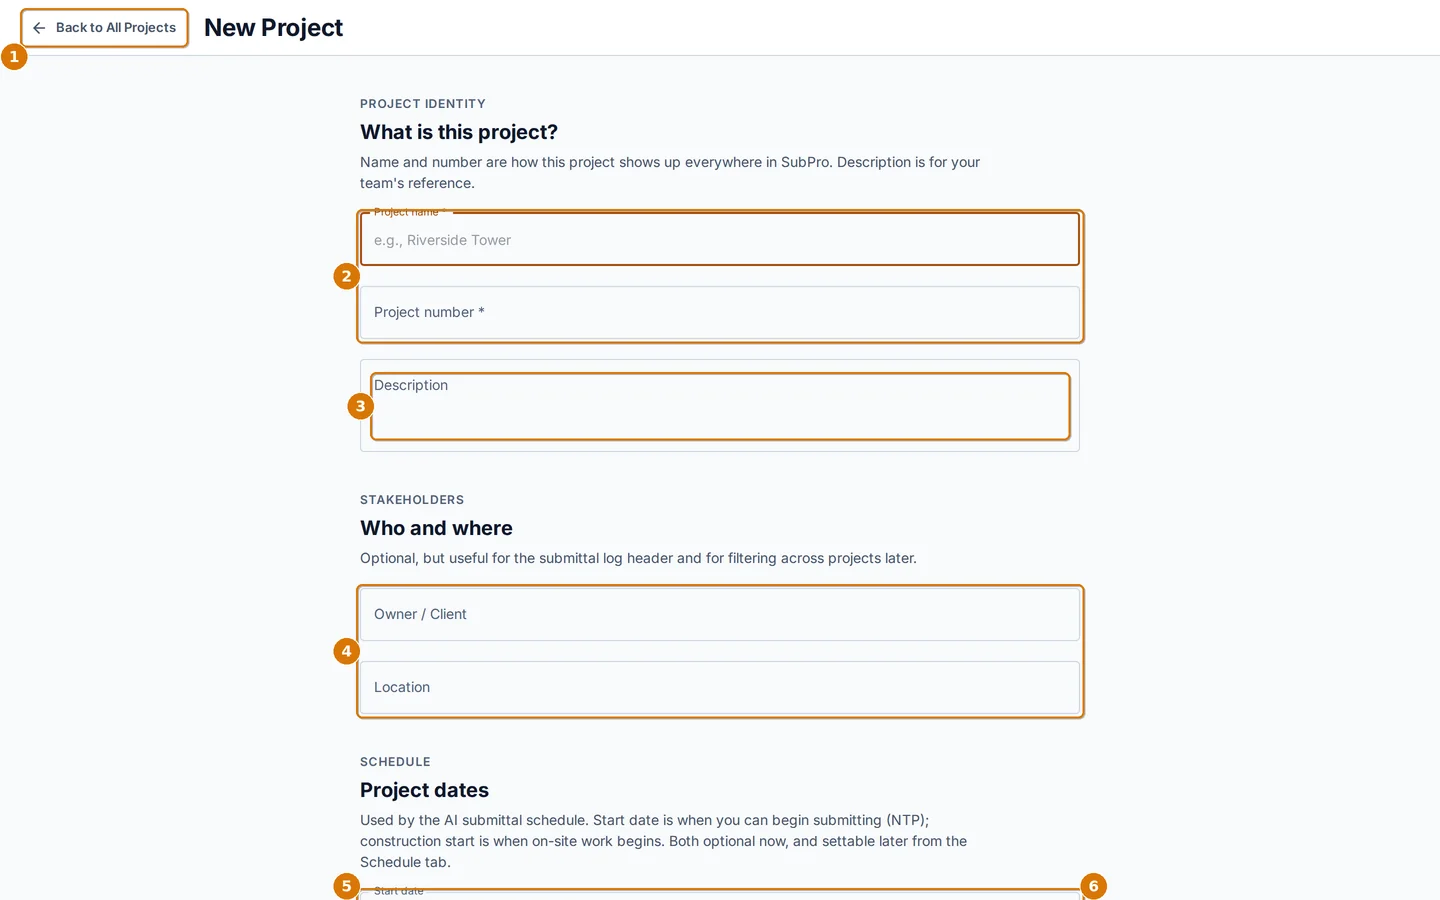 The New Project form
- 1Back to All Projects without saving
- 2Project name and project number (required)
- 3A short description
- 4Owner or client, and the site location
- 5Start date and construction start date. The schedule works back from the construction start
- 6Create the project
-
Add the people you send to: open the picker and choose Project parties.
Parties fill the To line of every transmittal and the email form. Tick default recipient on the person who reviews your submittals, usually the architect.
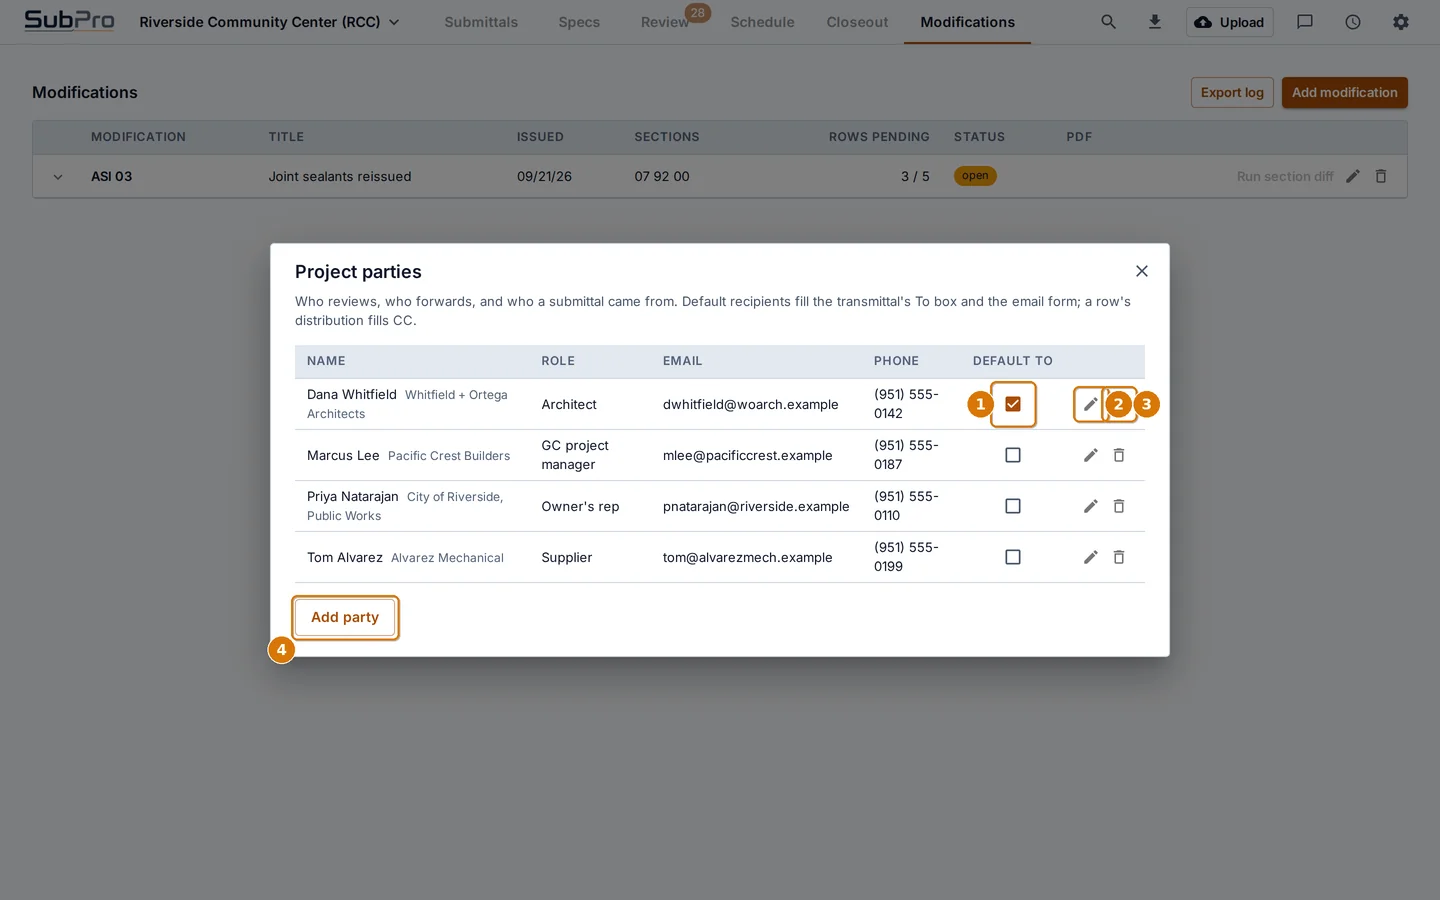 Project parties
- 1Default recipient. This person is filled in on every transmittal
- 2Edit a party
- 3Remove a party
- 4Add a party: name, company, role, email and phone
-
Record the contract details: open the picker and choose Project record.
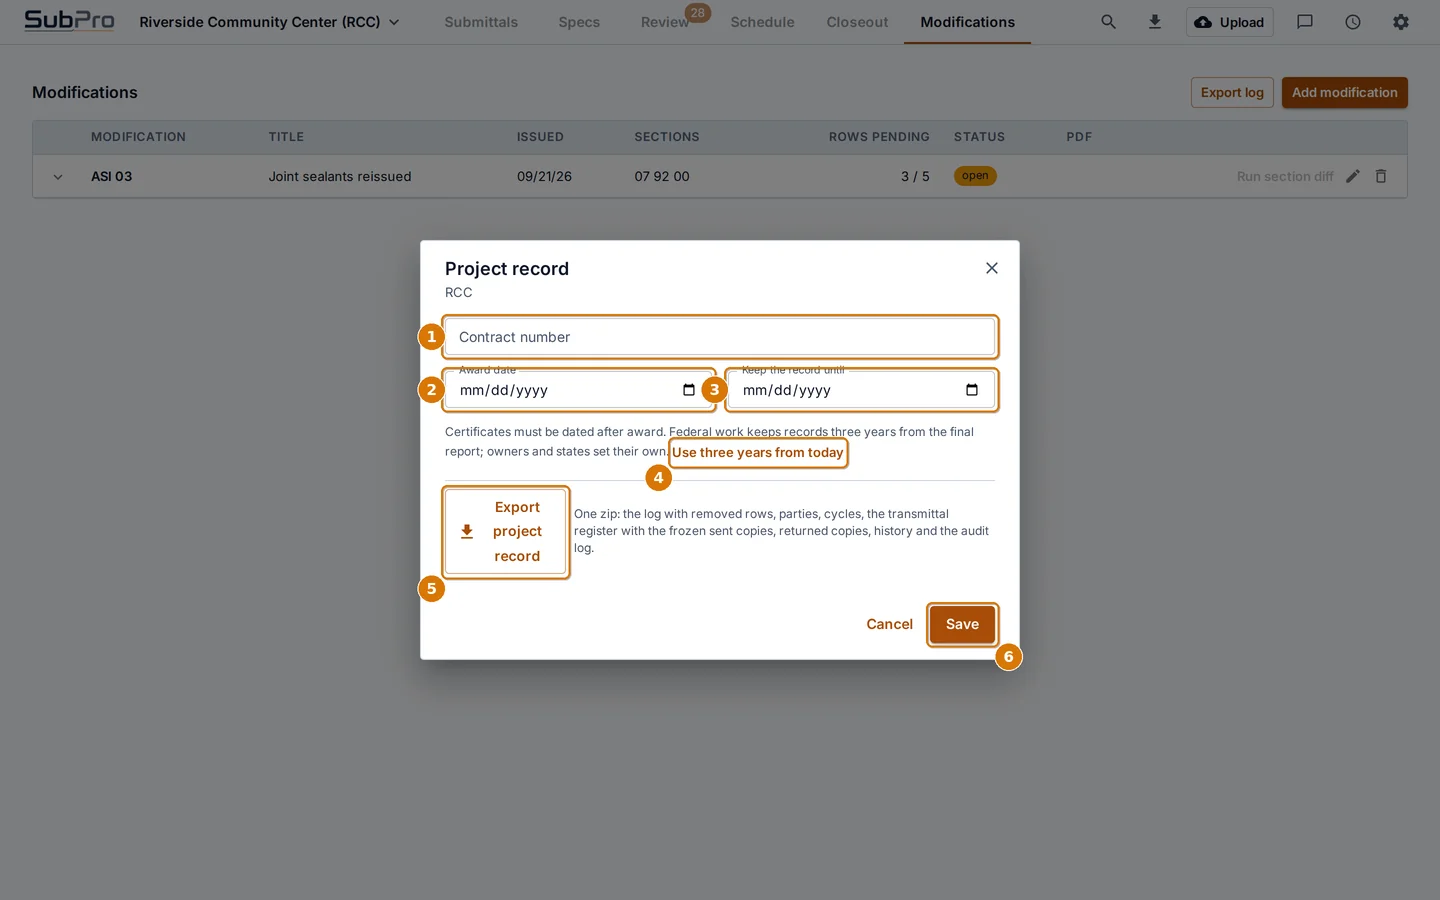 Project record
- 1Contract number, printed on transmittals
- 2Award date
- 3Keep records until this date
- 4Set retention to three years from today
- 5Export the project record as a file
- 6Save
Chapter 6Upload a spec book
One upload builds the whole log. A 500 page book takes a few minutes. You can keep working while it runs.
-
Open the project and click Upload in the top bar.
A file window opens. Pick the spec book PDF. SubPro accepts scanned books too and reads the scanned pages with OCR.
-
Watch the progress bar at the top of the log.
The bar shows the upload first, then the reading. The job keeps running in the SubPro service even if you close the app. When you come back, the log fills in on its own.
-
Open the Specs tab to see the book on file.
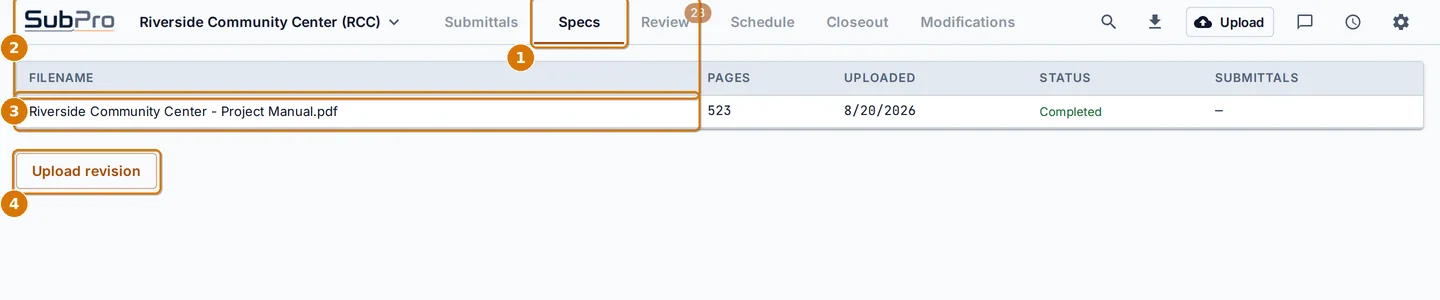 The Specs tab
- 1The Specs tab
- 2Filename, pages, upload date, status and the number of rows it produced
- 3The book on file. Its status turns Completed when the log is ready
- 4Upload a revised book later. See chapter 17
Same book twice?SubPro recognizes a book it has already read and returns the log at once. No waiting, no charge against your allowance.
Section warnings.Very large books can hit a reading limit on one section. SubPro retries, and if a section still fails it shows a warning instead of quietly leaving it out. Spot check that section in the viewer.
Chapter 7The submittal log
This is where you spend most of your time. Every row is one required submittal, in CSI order, with its status at the right.
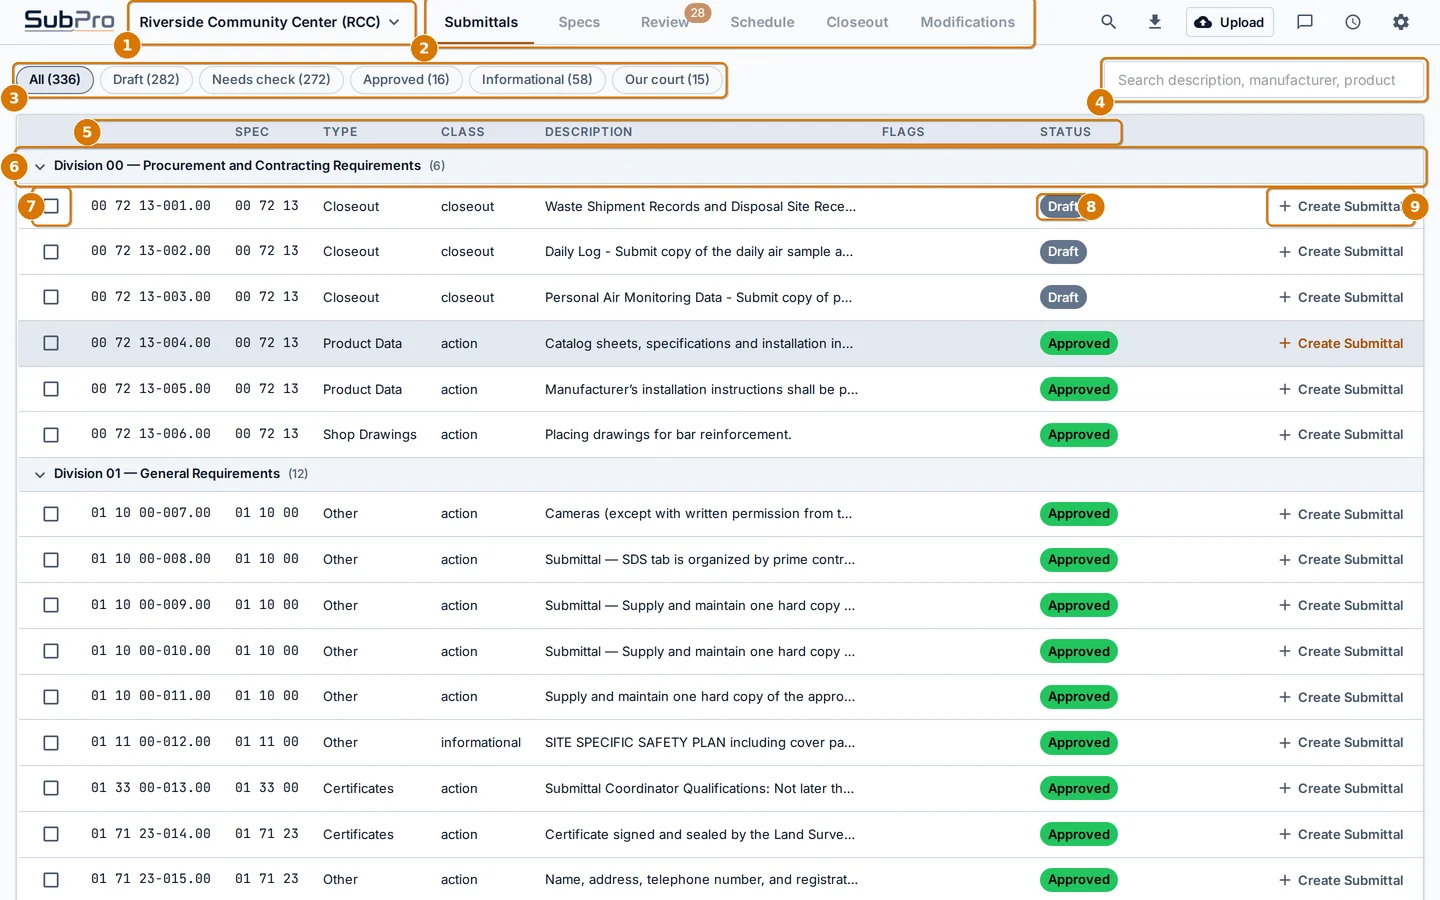
The Submittals tab
- 1Project picker
- 2The six project tabs
- 3Quick filters with live counts
- 4Search by description, manufacturer or product
- 5Column headers. Click one to sort, click again to flip
- 6Division header. Click to collapse or expand a division
- 7Select rows to combine them
- 8Status chip
- 9Build this row's submittal. See chapter 12
The columns
| Column | What it shows |
|---|---|
| # | The submittal number. SubPro shows it as section, ordinal and revision, for example 03 30 00-044.00. The stored number is RCC-044. |
| Spec | The CSI section the requirement came from. |
| Type | Product data, shop drawings, samples, certificates, test reports, closeout, and so on. |
| Class | Action, informational, or closeout. Action submittals need an approval. Informational ones are for record only. |
| Description | The requirement, in the spec book's own words. |
| Flags | Chips that ask for a second look: low confidence, possible duplicate, no page reference. |
| Status | Where the row is in the workflow. See the chart below. |
The quick filters
- All shows every row.
- Draft shows rows not yet sent.
- Needs check shows rows nobody has reviewed yet. Work this list down after an upload.
- Approved shows what is done.
- Informational shows record only rows.
- Our court shows rows waiting on you: drafts you owe, returns to resubmit.
How a row moves
| Status | Meaning | Who has it |
|---|---|---|
| Draft | Extracted from the book or added by hand. | You |
| Ready to send | Checked and ready. | You |
| Submitted | Sent. The clock starts. | Reviewer |
| Under review | Reviewer confirmed receipt. | Reviewer |
| Approved / Approved as noted | Done. Approved as noted means small corrections without a resubmittal. | Closed |
| Revise & resubmit | Fix and send again. The revision number goes up. | You |
| Rejected | Not accepted. Usually a different product is needed. | You |
Combine rows into one submittal
Spec books often list several lines that you would send as one package, for example product data and installation instructions for the same product. Combine them so the log matches what you actually send.
-
Tick the checkbox on two or more rows.
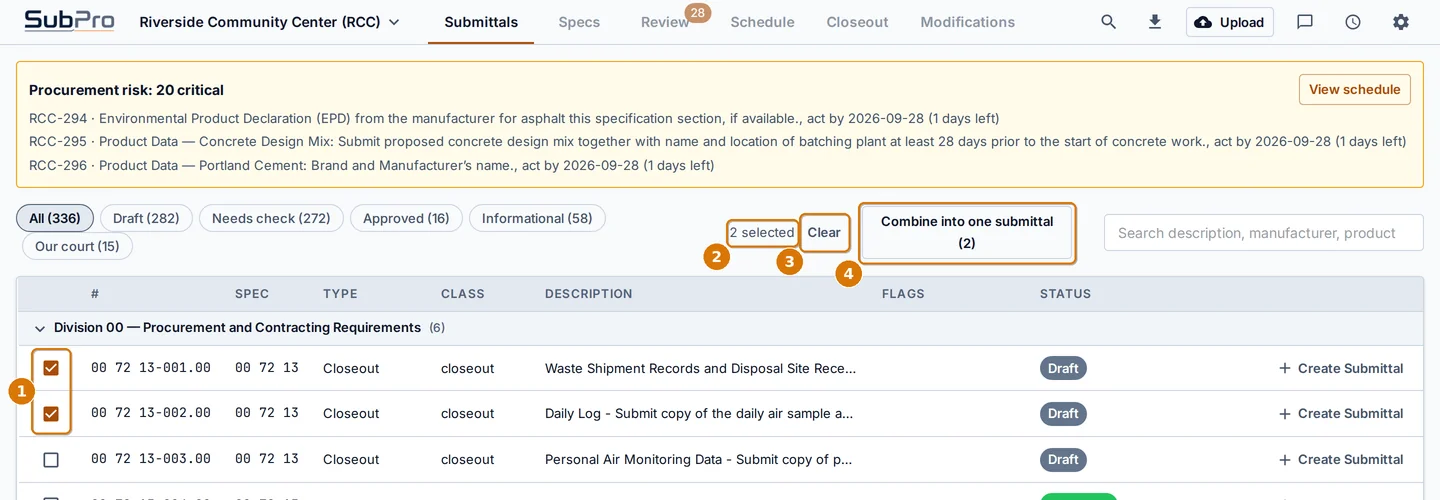 Selecting rows
- 1Tick the rows
- 2The count of selected rows
- 3Clear the selection
- 4Combine into one submittal
-
Click Combine into one submittal and choose the parent.
Either one of the selected rows becomes the parent, or you write a new umbrella description. The other rows become children with dotted numbers such as 044.1. Rows already sent keep their history.
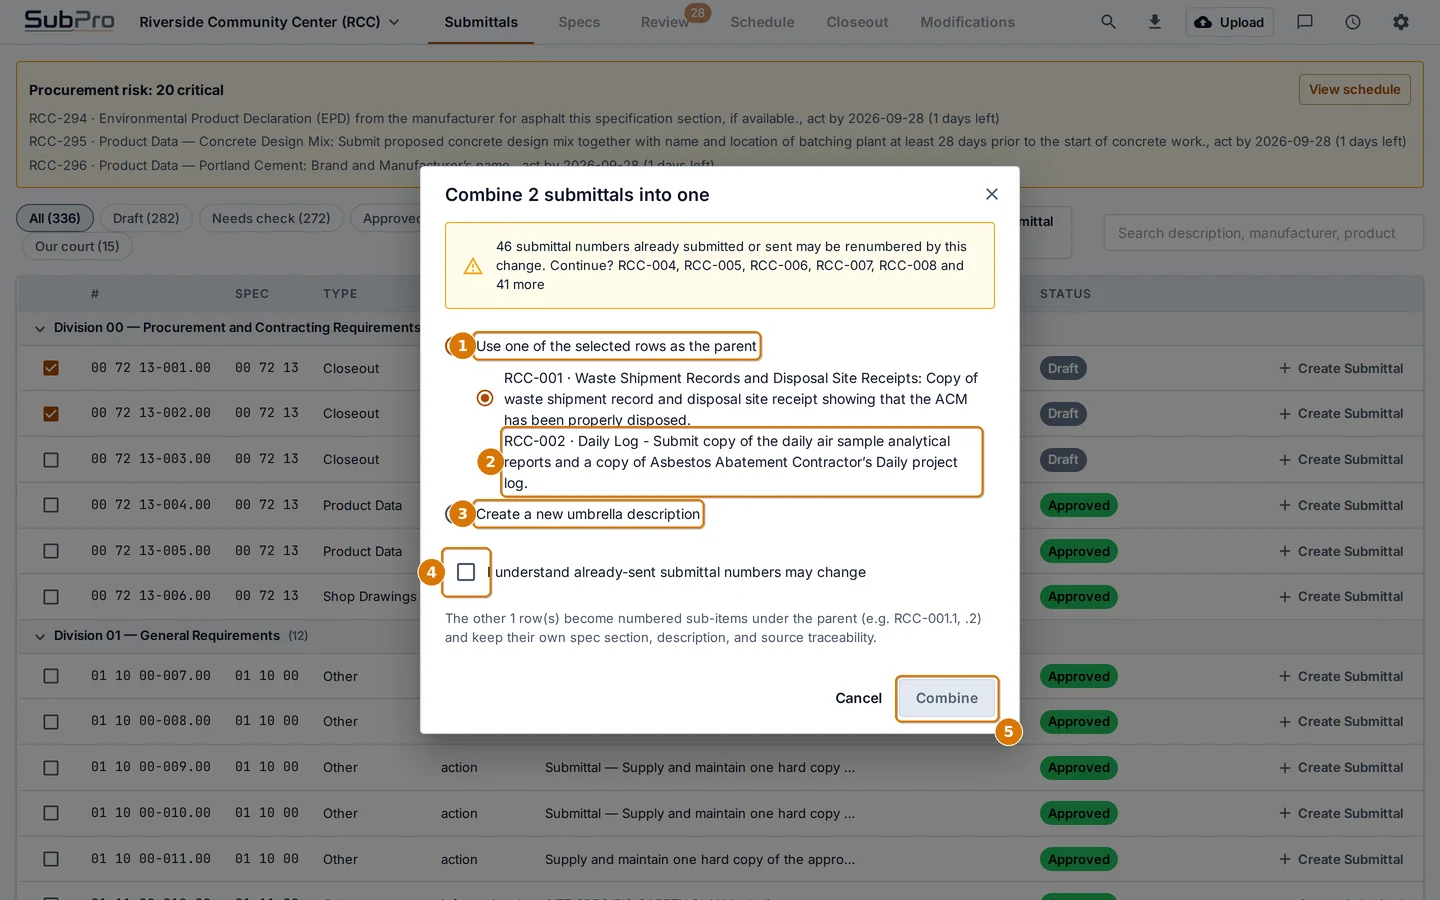 Combine into one submittal
- 1Use one of the selected rows as the parent
- 2Pick which row leads
- 3Or write a new umbrella description
- 4Confirm you understand that sent numbers may change
- 5Combine
Chapter 8Work a single submittal
Click any row and it opens in place. Everything you can do to one submittal lives in this panel.
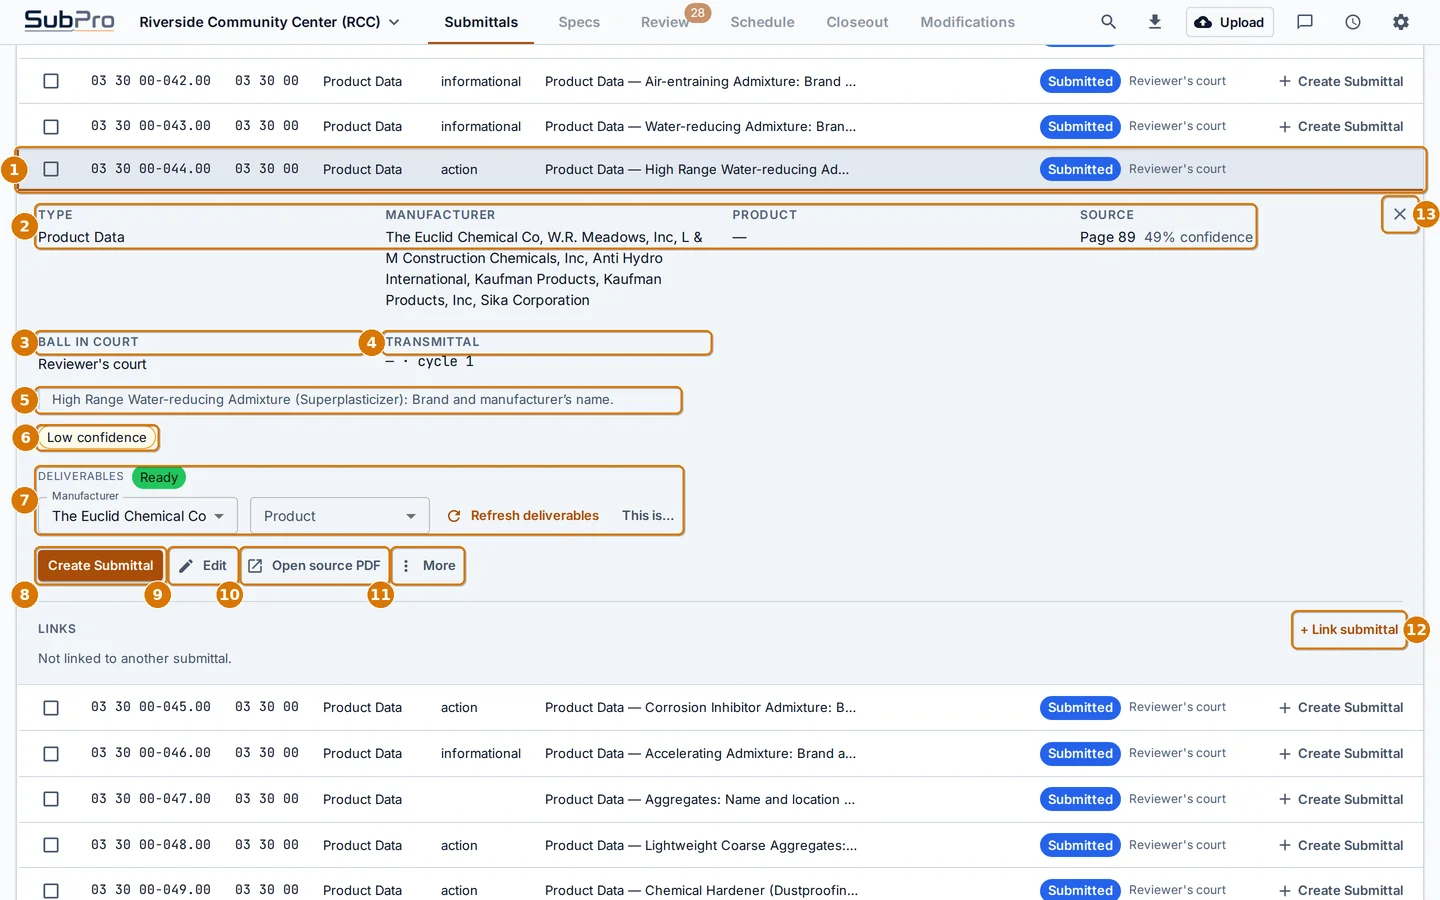
The detail panel
- 1The open row
- 2Type, specified manufacturers, product, and the source page with its confidence score
- 3Ball in court: who the row is waiting on
- 4Transmittal number and review cycle
- 5The exact text from the spec book
- 6Flags that ask for a second look
- 7Deliverables: manufacturer documents SubPro found. See chapter 10
- 8Create Submittal: build the transmittal and PDF
- 9Edit the row
- 10Open the spec book at the source page
- 11More: remove, copy the number, void
- 12Link this row to another row
- 13Close the panel
Edit a row
-
Click Edit in the panel.
Change anything the extraction got wrong, choose the manufacturer you are actually submitting, and record drawing references or a deviation. Only the fields you change are saved.
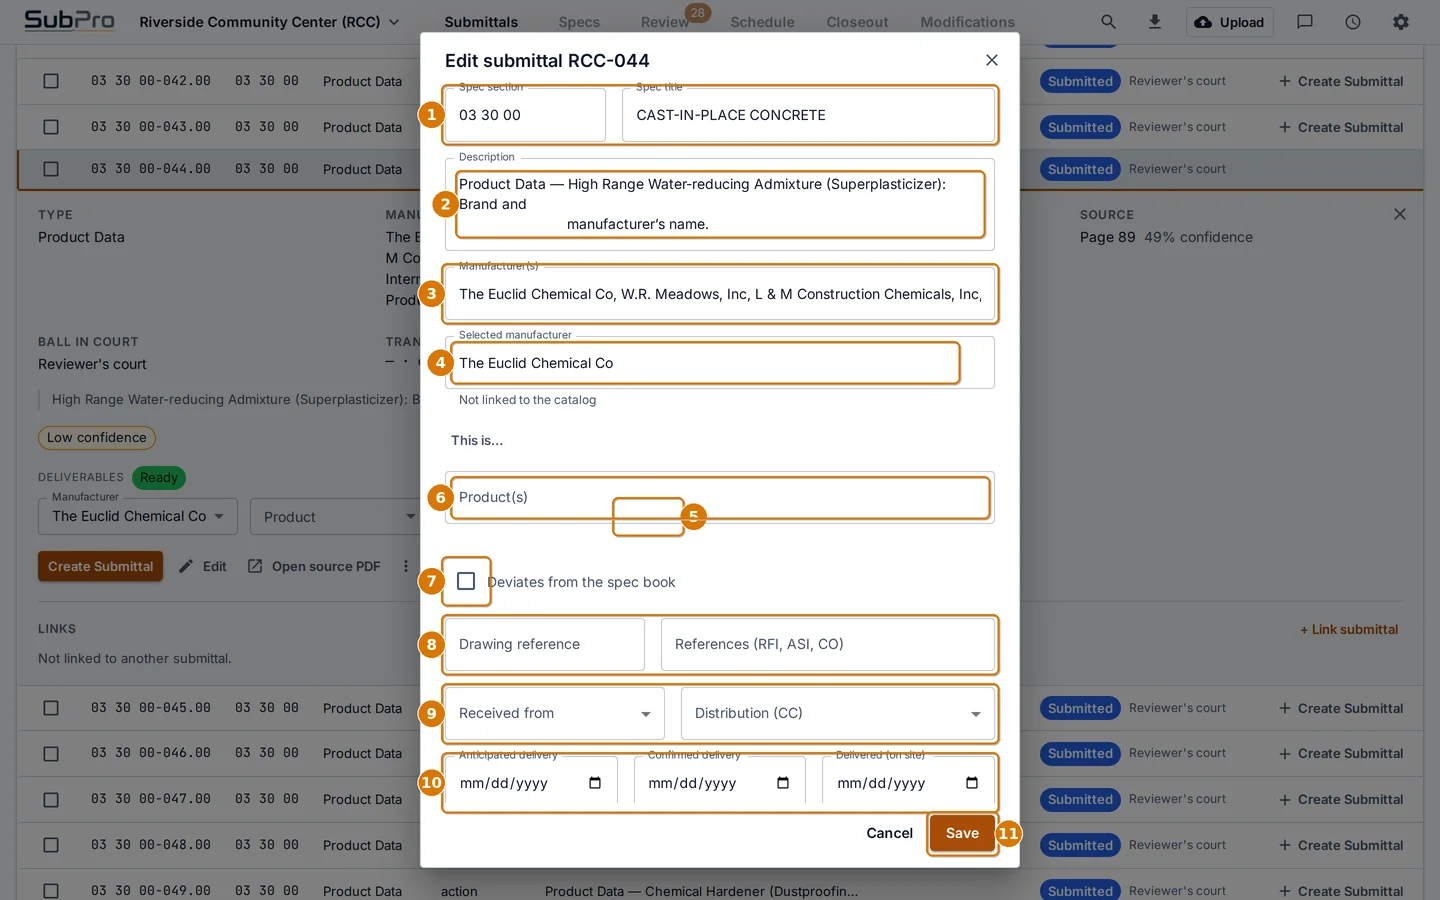 Edit submittal
- 1Spec section and title
- 2Description
- 3All manufacturers named in the spec book, comma separated
- 4The manufacturer you are submitting
- 5This is…: link the name to the SubPro catalog so documents can be found
- 6Products
- 7Tick if your product deviates from the spec book, then describe the deviation
- 8Drawing reference and other references (RFI, ASI, CO)
- 9Who you received it from and who is copied
- 10Anticipated, confirmed and actual delivery dates
- 11Save
Deviations.If you tick Deviates from the spec book, describe the deviation. SubPro prints it on the transmittal and warns you before sending if the note is empty, because an undescribed deviation can get an approval rescinded later.
Mark a row as submitted
Use this when a submittal went out some other way, for example by hand or from another system, and you want the log to show it.
-
Open a draft row and click Mark as submitted.
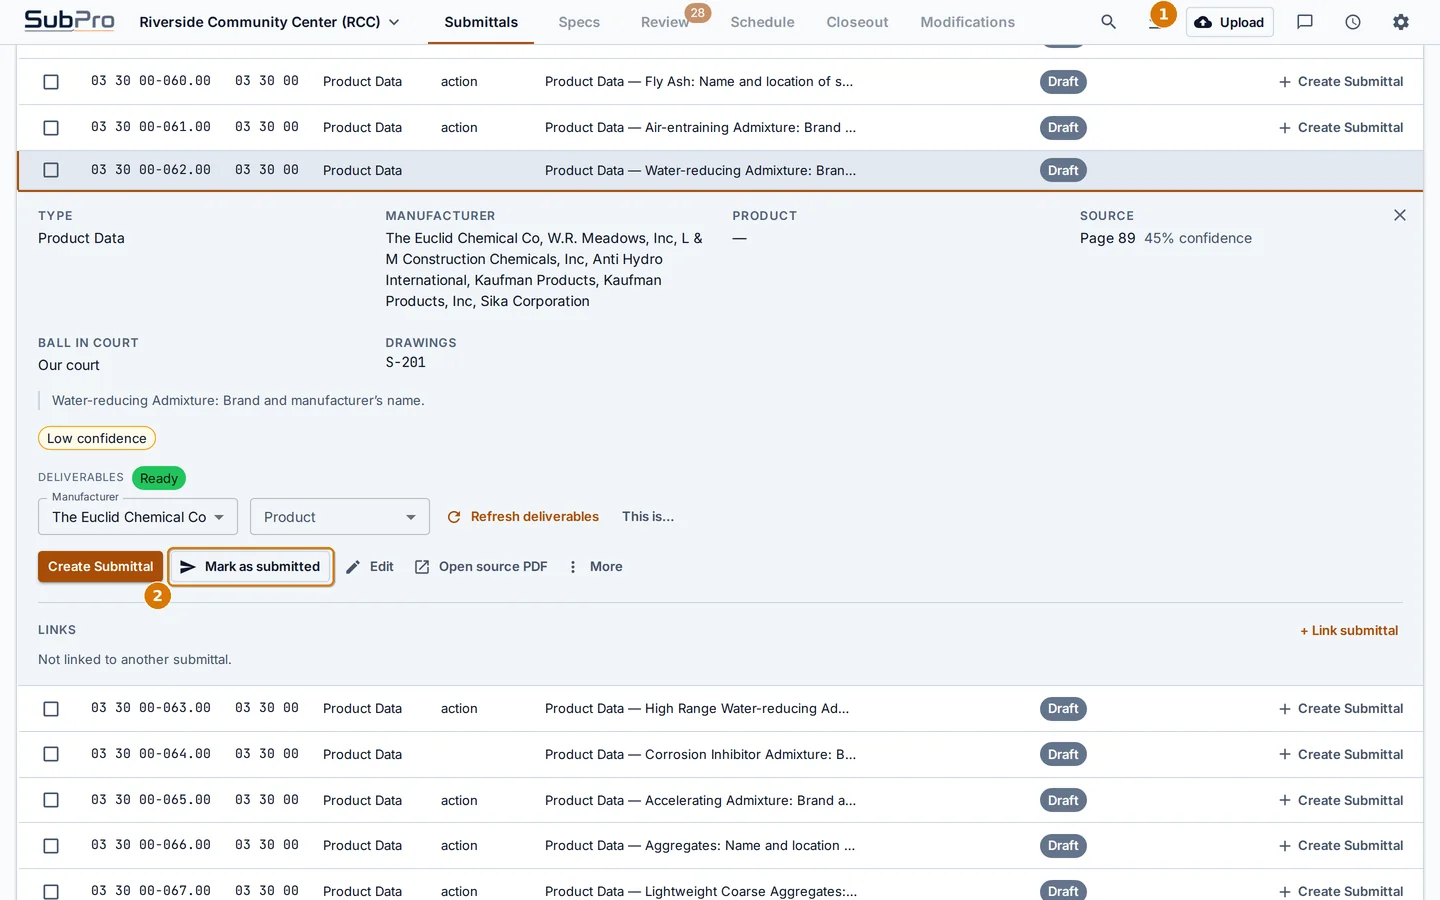 A draft row
- 1Ball in court shows Our court on a draft
- 2Mark as submitted
-
Set the date, add a note if you want, and confirm.
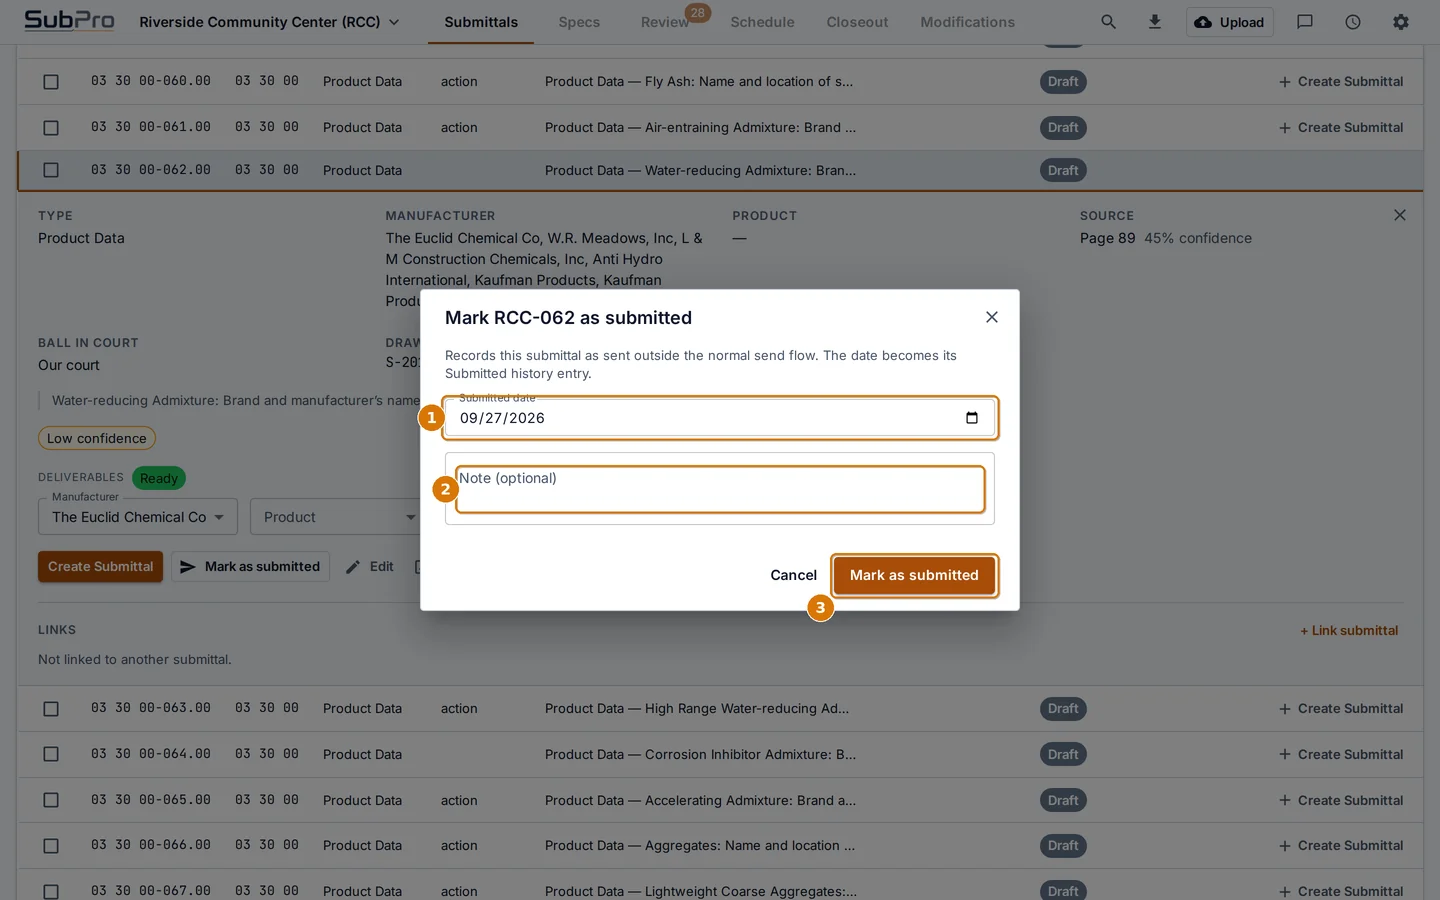 Mark as submitted
- 1The date it went out. This becomes the Submitted entry in the history
- 2An optional note
- 3Confirm
The More menu
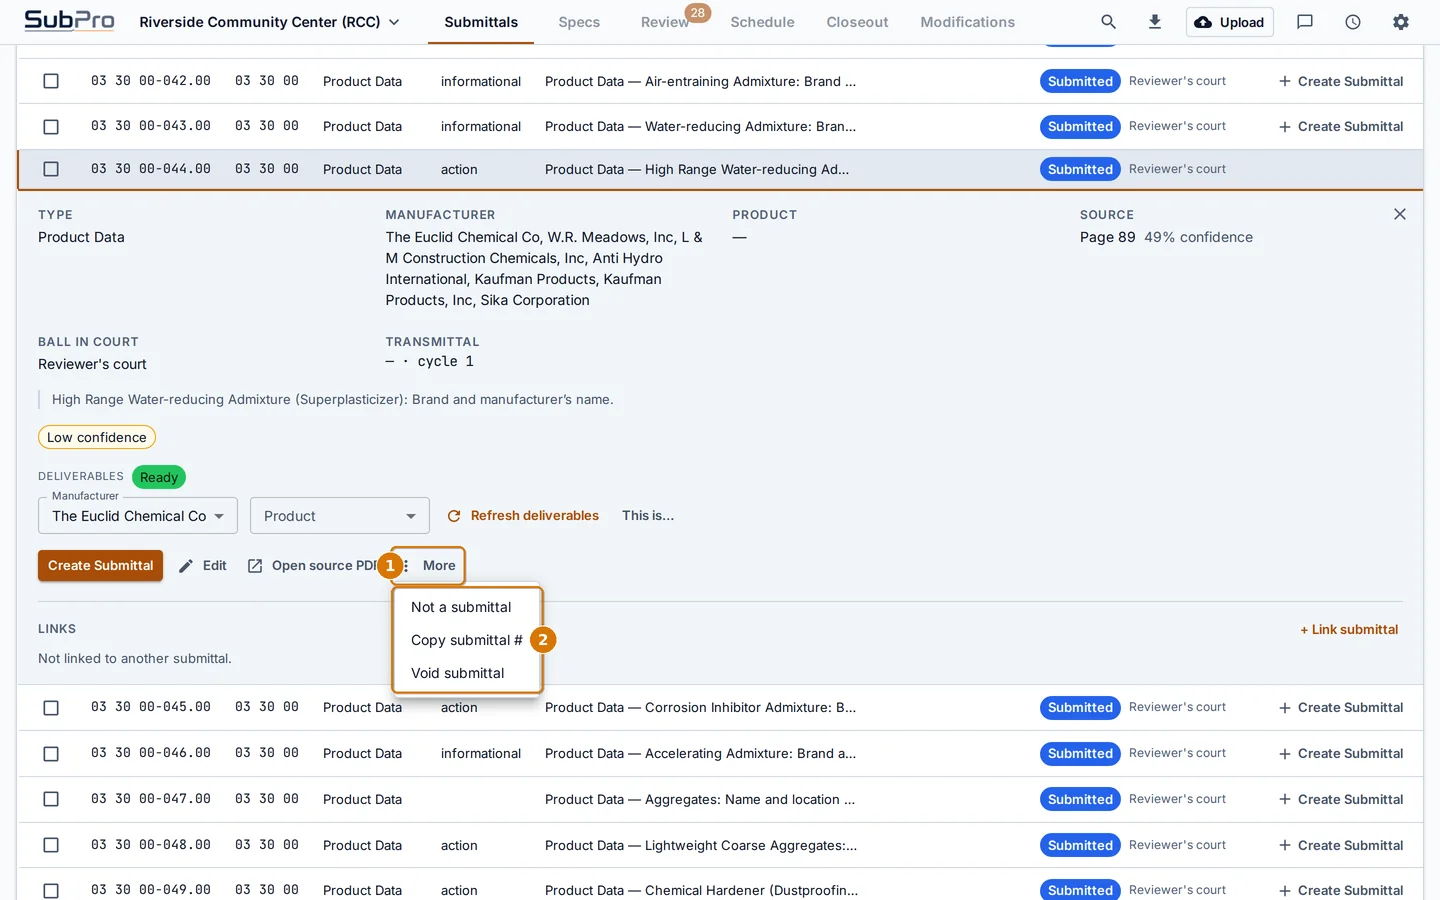
More
- 1The More button
- 2Not a submittal removes the row. Copy submittal # copies the number. Void withdraws a row and keeps its number unused
-
To remove a row the extraction should not have made, choose Not a submittal.
Tell SubPro why. The reason improves the next extraction. The row leaves the log, the exports and the chat.
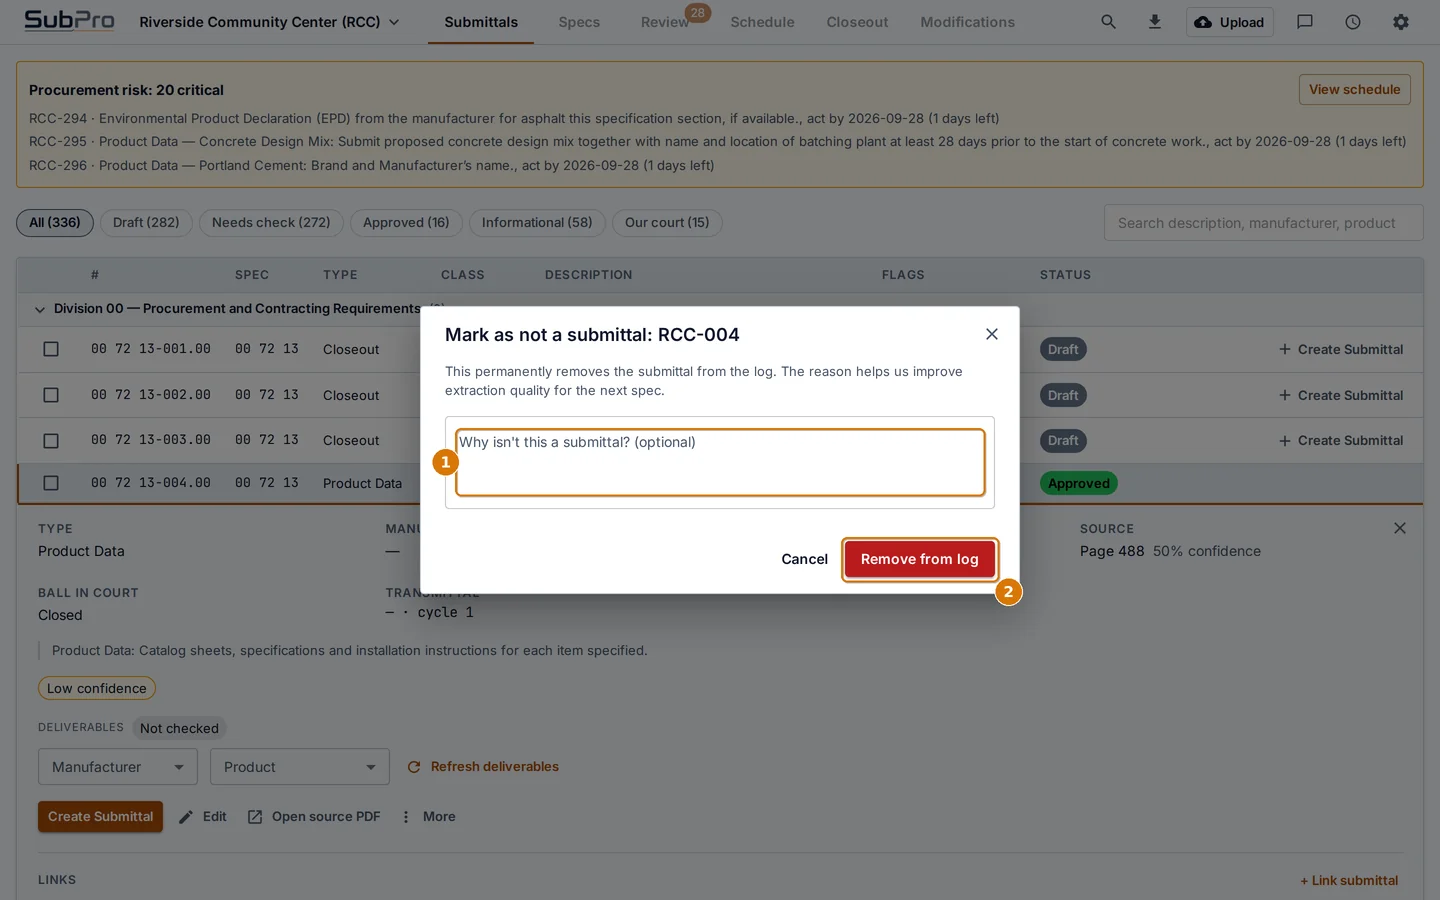 Not a submittal
- 1Why it is not a submittal (optional)
- 2Remove from log
Link two rows
-
Click + Link submittal at the bottom of the panel, choose the link type, and pick the other row.
Related is a plain cross reference. Supersedes says this row replaces the other one. Depends on says the other row must be approved first.
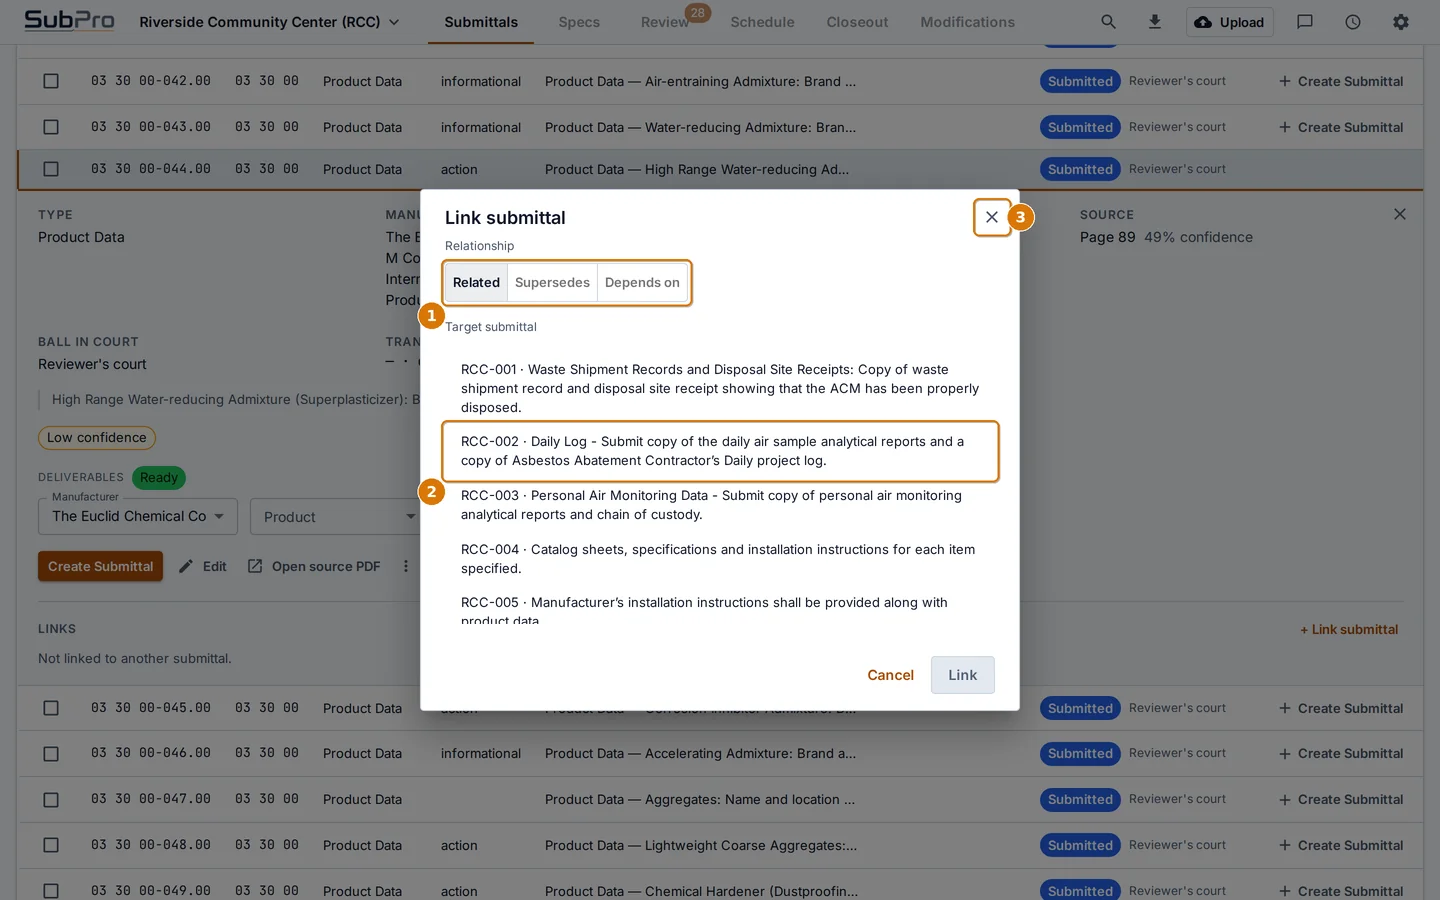 Link submittal
- 1Link type
- 2Pick the other row from the list
- 3Close
Chapter 9Check the source page
When someone asks "where does the spec say that?", the answer is one click away.
-
Open a row and click Open source PDF.
The spec book opens at the cited page. The band at the top repeats the exact sentence the row came from so you can find it on the page.
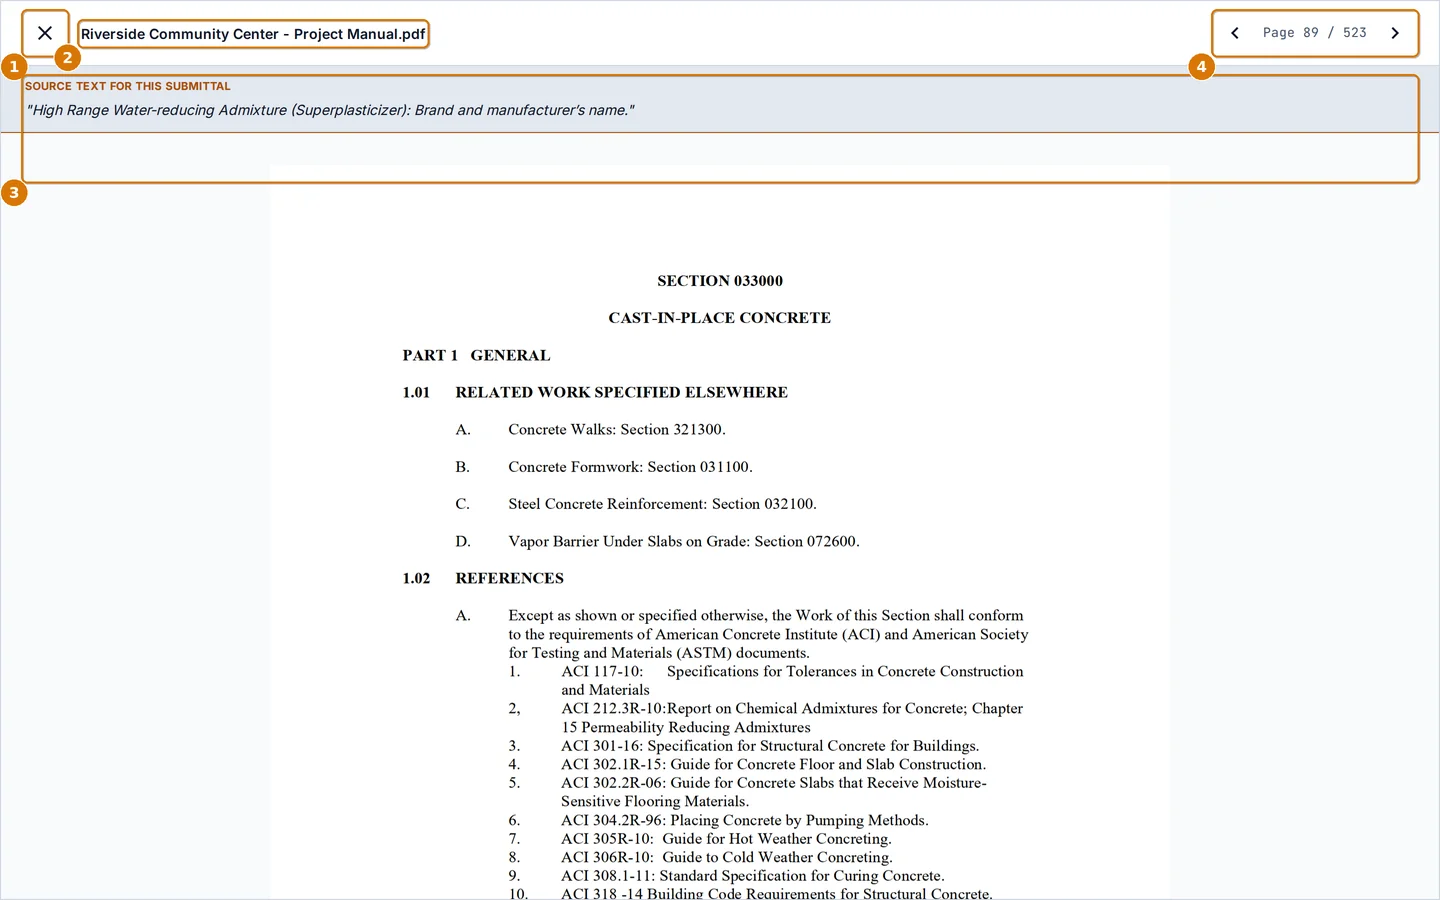 The spec book viewer
- 1Close the viewer
- 2The book you are reading
- 3The source text for this submittal
- 4Page back and forward. The counter shows the page and the total
No PDF available?The viewer's copy of the book lives on the computer where it was uploaded. On a new computer, upload the book again. The log comes back at once because the book has already been read.
Chapter 10Manufacturer documents
For rows with a known manufacturer and product, SubPro looks up the documents the submittal needs in its manufacturer catalog. This is the Deliverables section of the panel.
-
Pick the manufacturer and product in the Deliverables section.
The manufacturer list is filled from the spec book. If the name is not in the catalog yet, click This is… and pick the catalog entry it matches. SubPro remembers the match for the whole project.
-
Read the status chip and click Refresh deliverables if it is still searching.
| Chip | Meaning |
|---|---|
| Ready | The documents are on file and go into the package automatically. |
| Partial | Some documents are ready, some are missing. The missing kinds are listed. |
| Researching | The catalog is still locating the document. Check back later. |
| Not found | Nothing was found. Attach your own cut sheets when you build the package. |
| Not checked | No manufacturer chosen yet. |
The package does not wait.You can build and send a submittal at any time. Documents that are ready are merged in. Anything missing you attach yourself.
Chapter 11Set up your transmittal
SubPro prints every transmittal onto your company's own sheet. You set the sheet up once per project, and it takes about two minutes.
-
Click Create Submittal on any row. The first time, SubPro asks for a template.
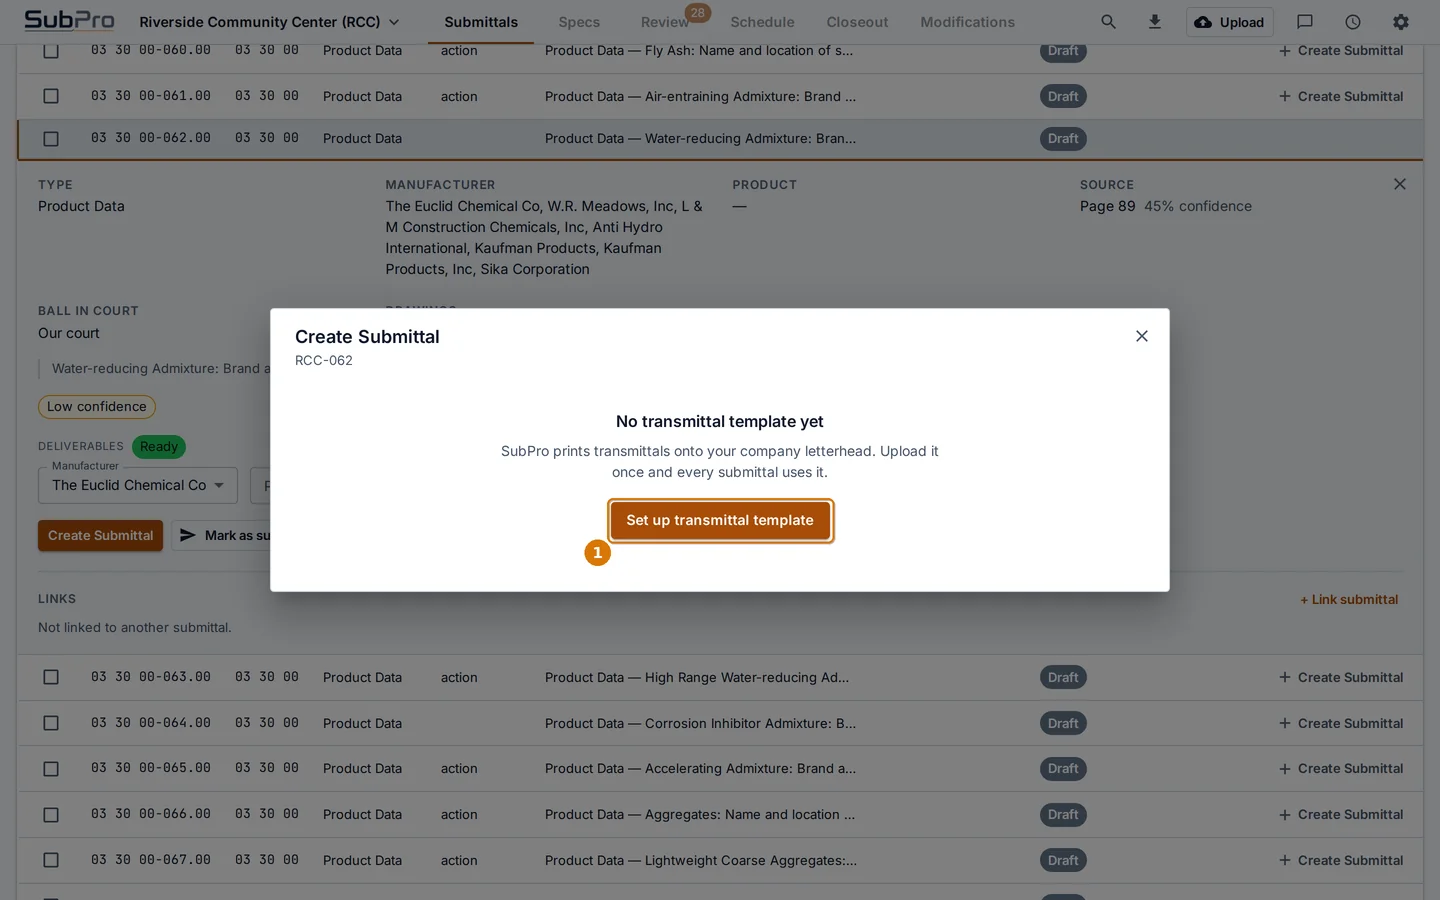 No template yet
- 1Set up transmittal template
-
Click Choose File and pick your transmittal sheet.
Use a one page PDF of your blank transmittal form or letterhead. The labels on the form (Project, Date, To, Description and so on) are what SubPro looks for.
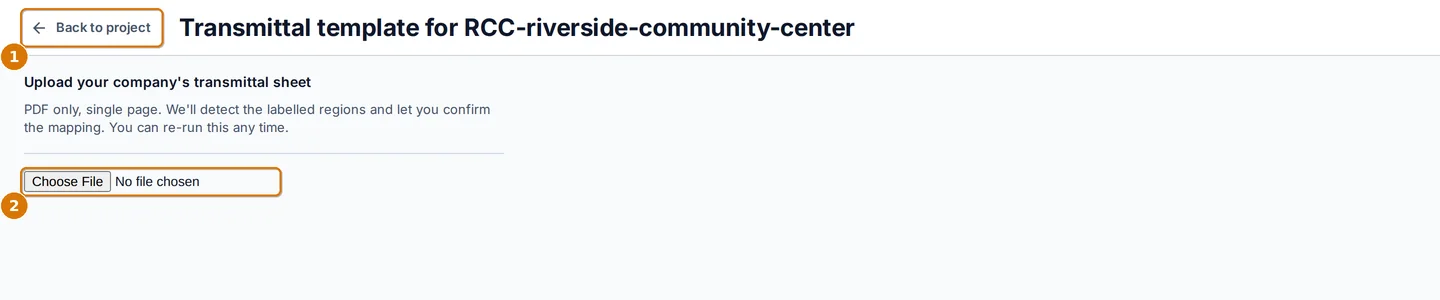 The template page
- 1Back to the project
- 2Choose the PDF
-
Check the mapping SubPro suggests, fix any field that is wrong, and click Save template.
Green boxes on the preview are regions SubPro found. The list on the right says which SubPro field fills each one. Change a dropdown if a box got the wrong field. Leave a box Unmapped to keep it blank.
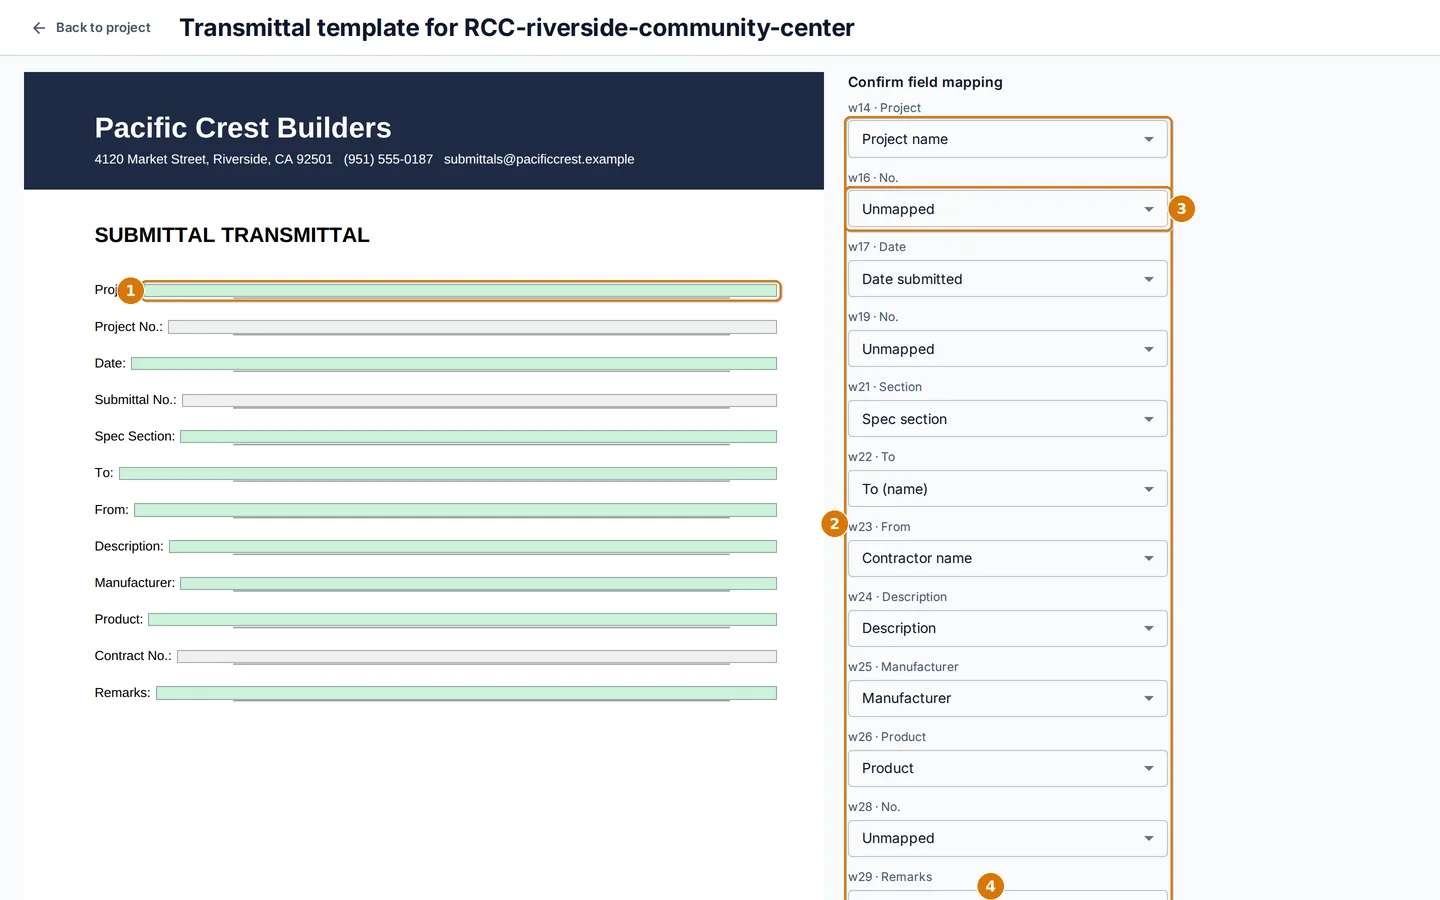 Confirm field mapping
- 1A region SubPro found on your sheet
- 2One dropdown per region, in page order
- 3Unmapped means the box stays blank
- 4Save template
Map the Certified By box.Reviewers return unstamped submittals as Not Reviewed. If your sheet has a certification or stamp box, map it. SubPro warns you before every send if it is not mapped.
Chapter 12Build and send a submittal
One submittal is one row: the transmittal cover, your cut sheets, and any manufacturer documents, merged into one PDF with continuous page numbers.
-
Open the row and click Create Submittal.
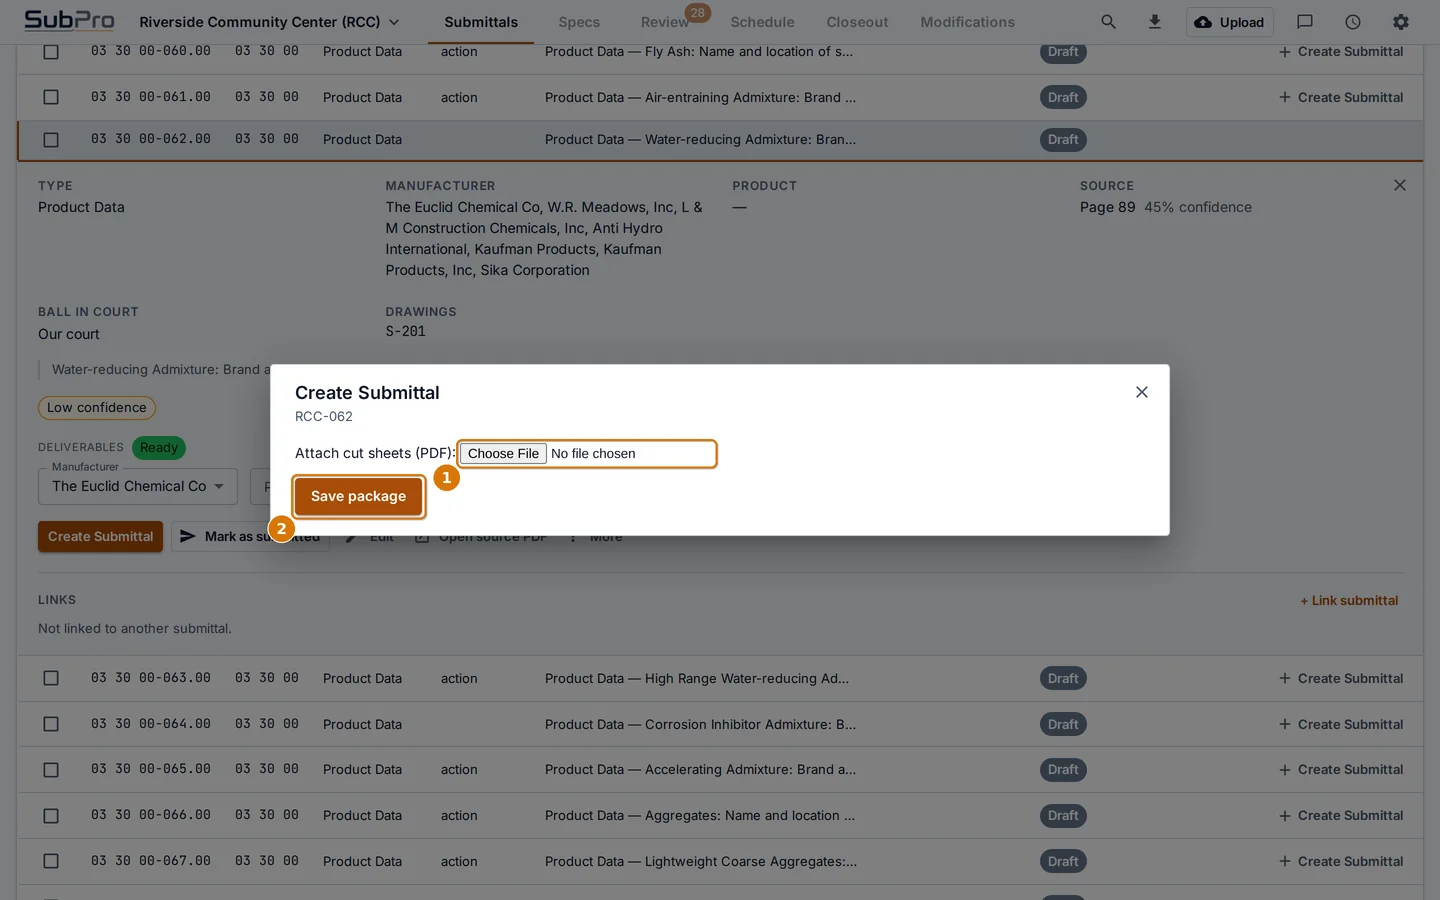 Create Submittal
- 1Attach cut sheets. Pick one or more PDFs
- 2Save package renders the transmittal and merges everything
-
Attach your cut sheets, then click Save package.
The transmittal appears in the preview with the project, date, section, recipient, description and manufacturer already filled from the row. The page count under the preview includes your attachments. The file is saved under Documents\SubPro\projects\<project>\submittals.
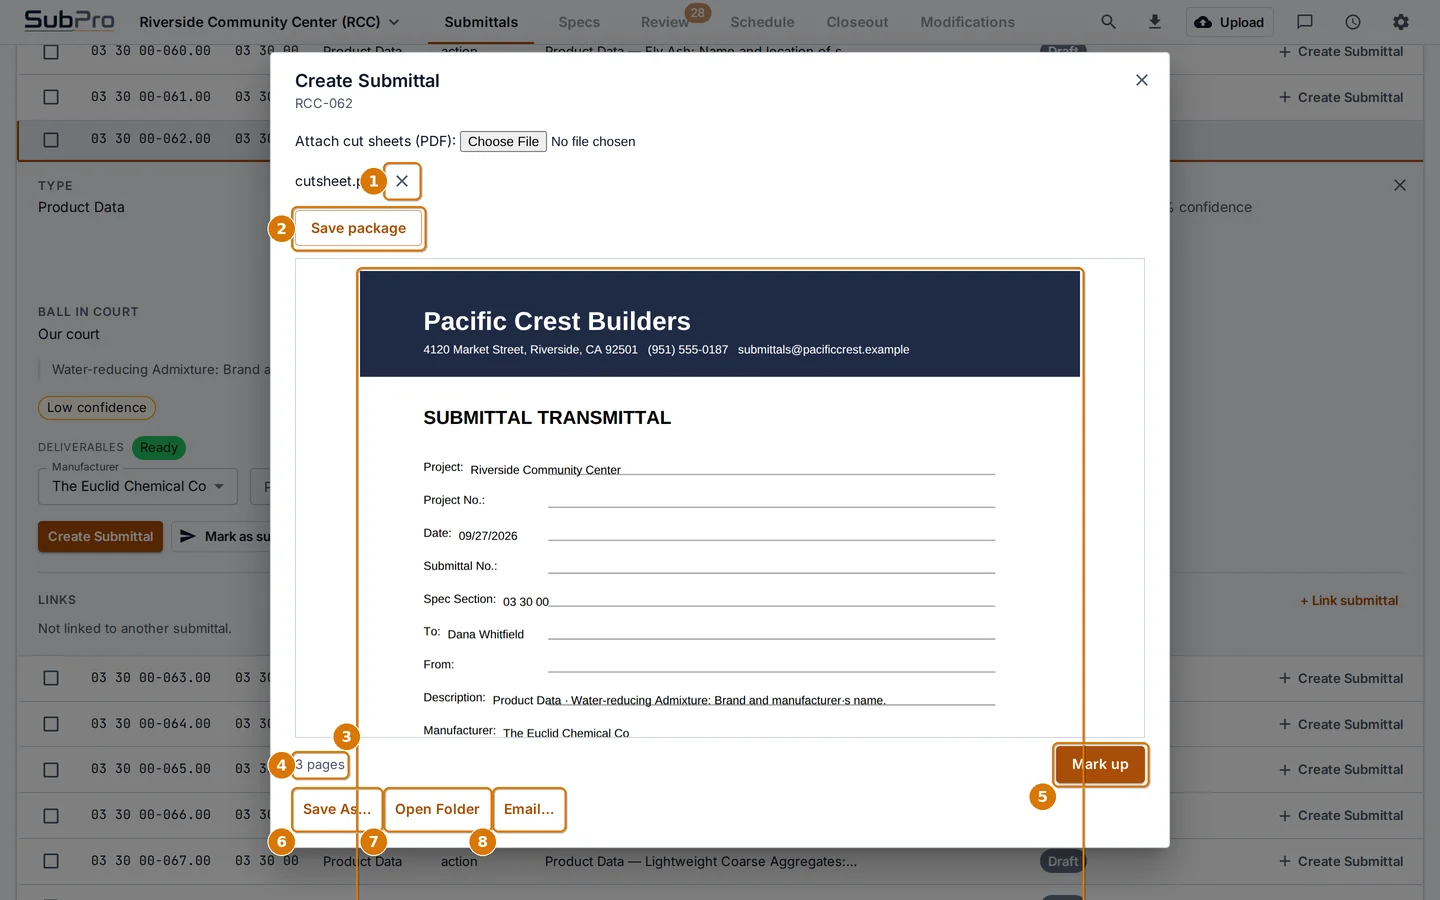 The rendered submittal
- 1An attached cut sheet. Click the cross to remove it
- 2Save package again after changing attachments
- 3The preview. Scroll to read every page
- 4Total pages
- 5Mark up the pages. See chapter 13
- 6Save a copy somewhere else
- 7Open the project folder
- 8Email the submittal
-
Click Email…, check the form, tick the box if there is a warning, and click Send.
The To line is filled from the default recipient. Put your own address in Your email to get replies and a copy. The mail goes out through your company's Microsoft 365 mailbox, so it appears in your Sent folder too. The row moves to Submitted and the review clock starts.
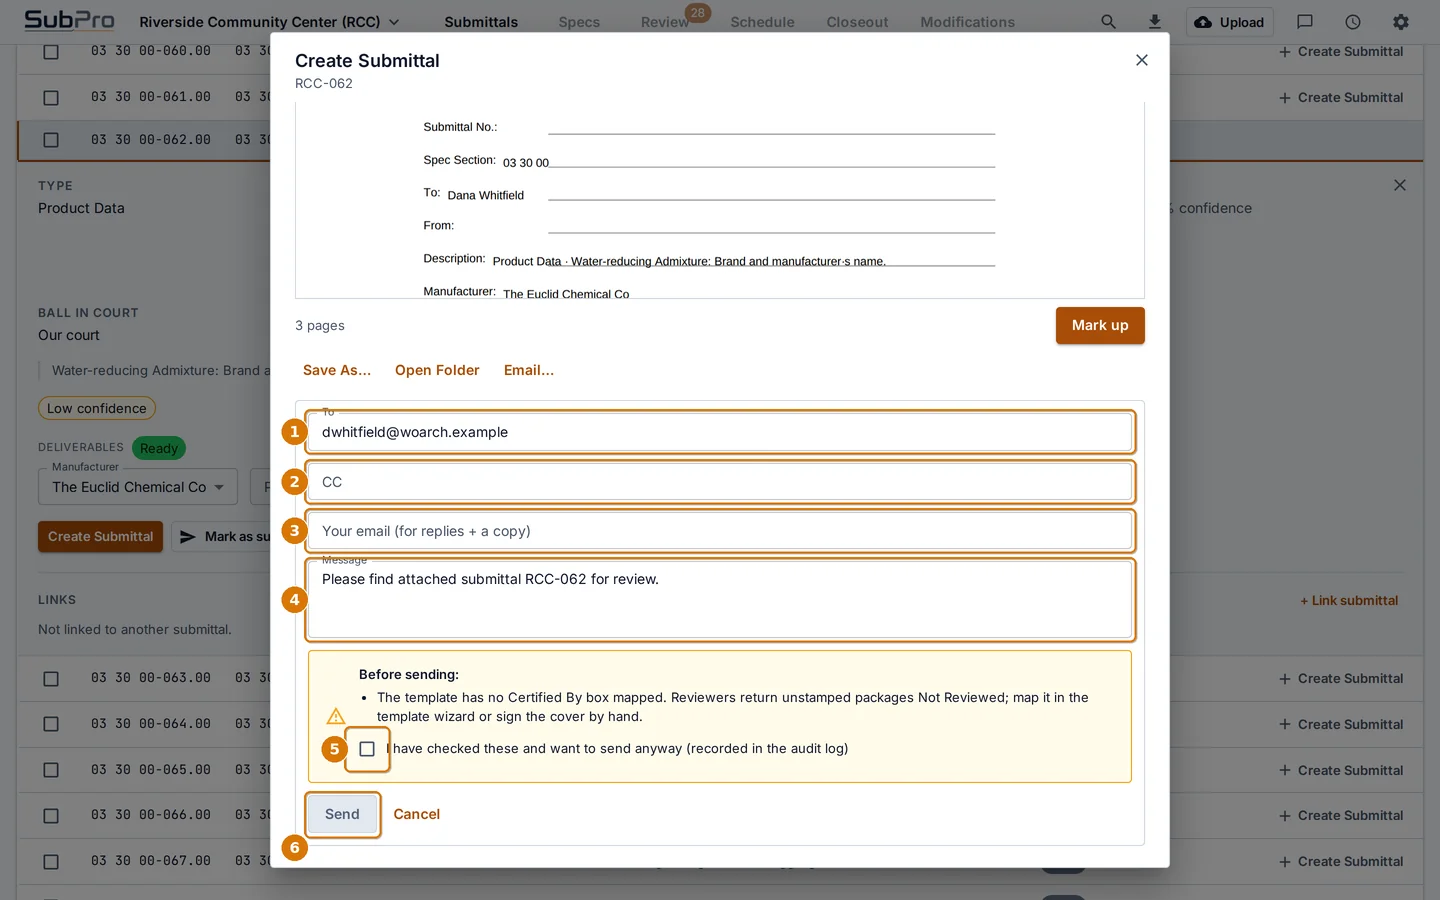 The email form
- 1To, filled from the project parties
- 2CC
- 3Your email, for replies and a copy
- 4The message. Edit it freely
- 5Warnings before sending. Tick the box to send anyway. The choice is recorded in the audit log
- 6Send
First time sending?Email needs your Microsoft 365 mailbox connected once. Open Settings, Show advanced, and use the Mail card. See chapter 19.
Chapter 13Mark up the pages
Circle the product you are submitting, cloud a dimension, stamp the cover. The markup editor works on the rendered submittal before you send it.
-
Click Mark up under the preview.
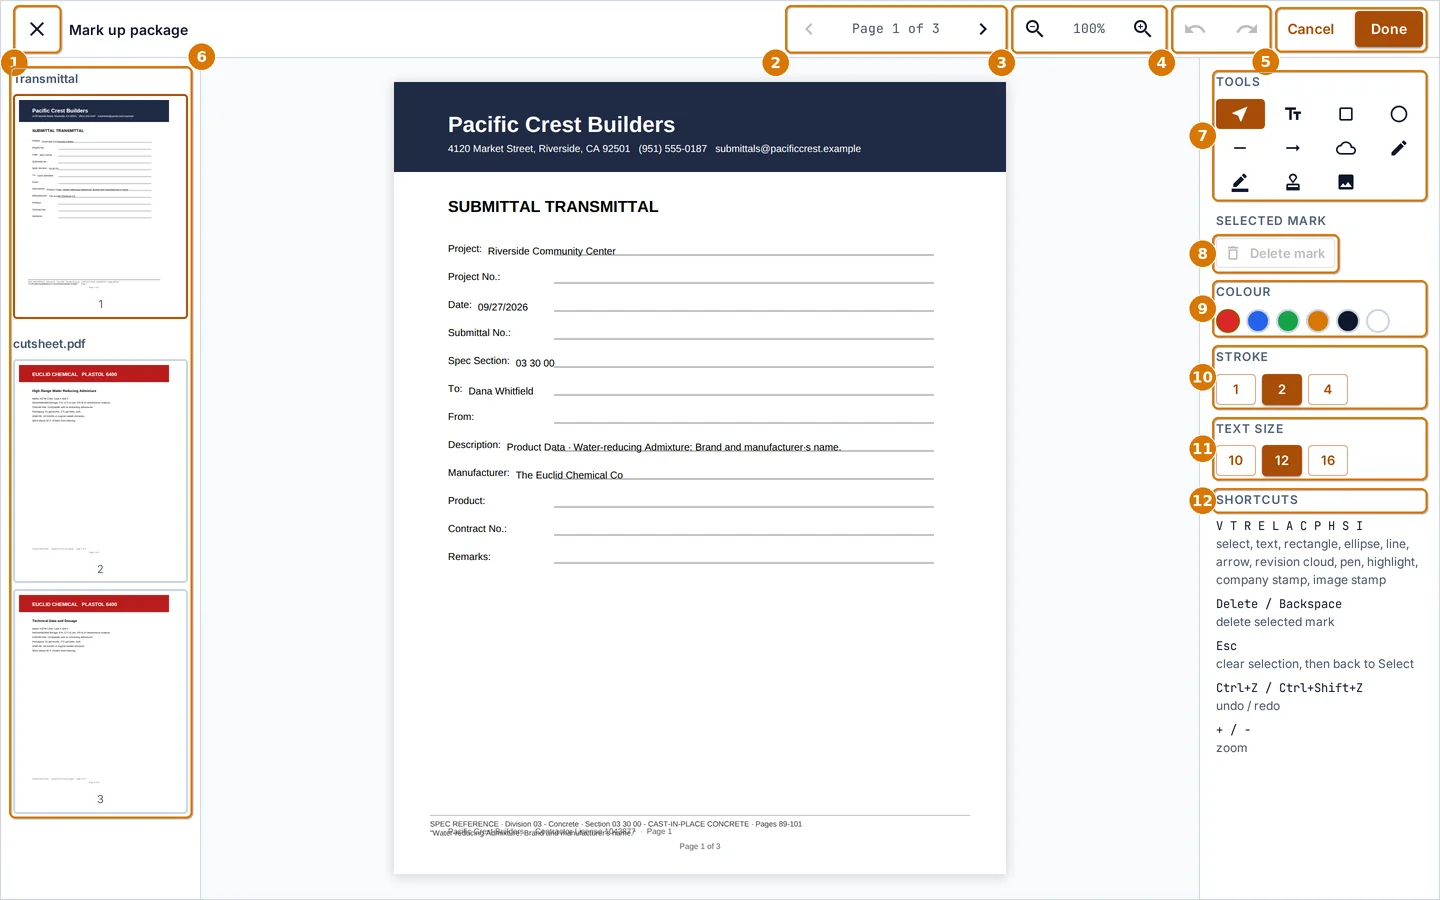 The markup editor
- 1Close without saving
- 2Page back and forward
- 3Zoom out and in
- 4Undo and redo
- 5Cancel, or Done to save the marks into the PDF
- 6Page thumbnails. Click one to jump
- 7Tools: select, text, rectangle, ellipse, line, arrow, revision cloud, pen, highlight, company stamp, image stamp
- 8Delete the selected mark
- 9Color
- 10Stroke width
- 11Text size
- 12Keyboard shortcuts for every tool
-
Pick a tool, draw on the page, and click Done.
Press V to go back to Select, Delete to remove a mark, Ctrl+Z to undo. Marks are burned into the saved PDF when you click Done. Cancel throws them away.
Company stamp.Set your stamp line and initials once in Settings and the stamp tool places them with today's date. See chapter 19.
Chapter 14Track reviews and responses
The Review tab shows every submittal that has gone out, how many days it has been out, and what came back. The badge on the tab counts rows waiting on someone.
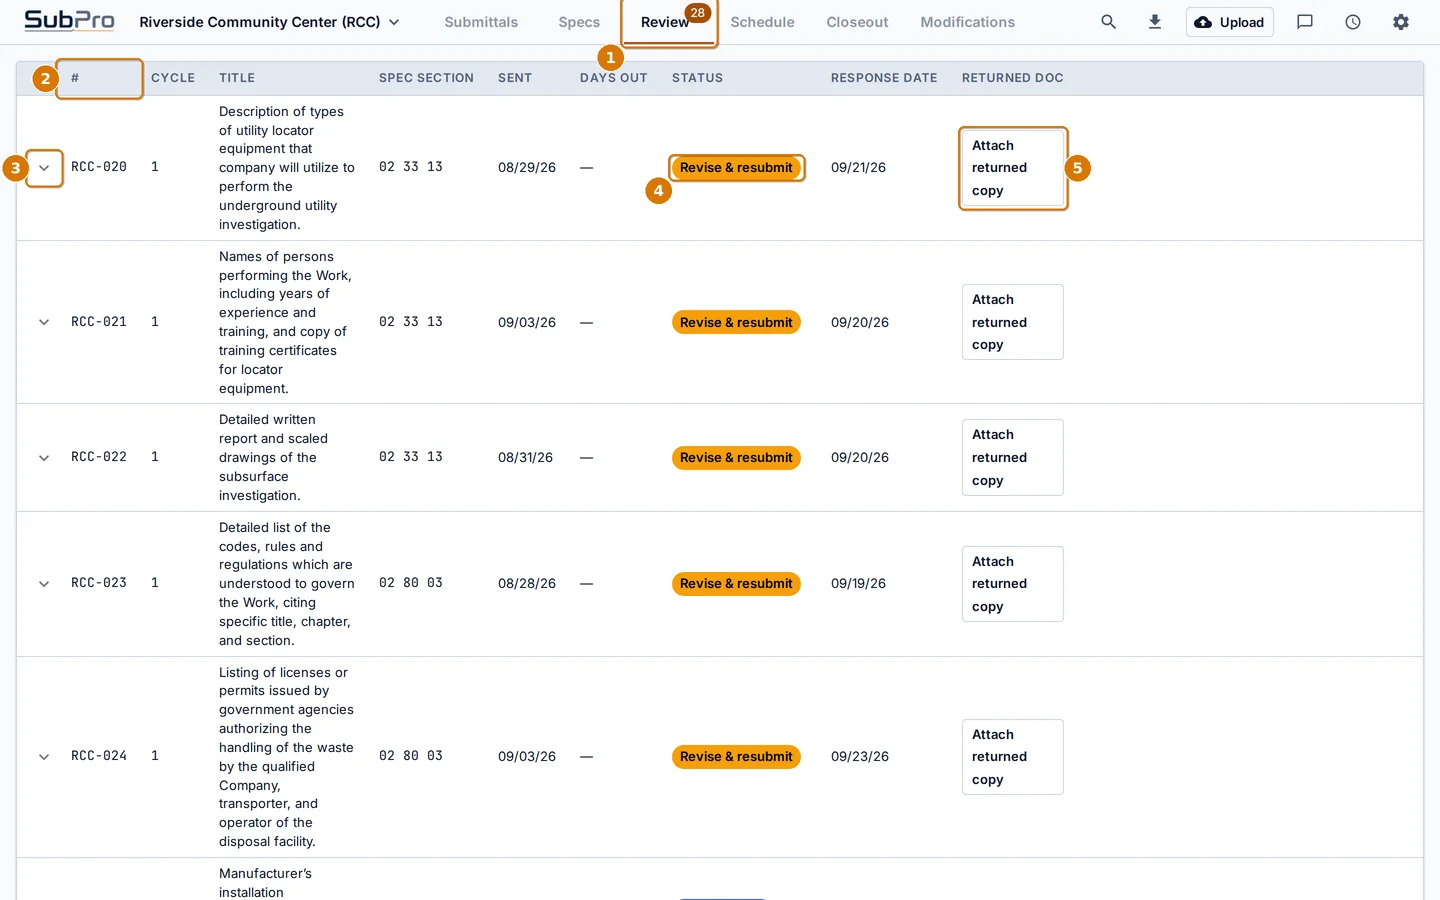
The Review tab
- 1The Review tab and its waiting count
- 2Number, cycle, title, section, sent date, days out, status, response date and returned document
- 3Open the status history of a row
- 4Status chip
- 5Attach the reviewer's returned copy to the row
Log the reviewer's response
-
Find the row and click the action that matches the reviewer's stamp.
Rows still marked Submitted also offer Mark under review for when the reviewer confirms receipt.
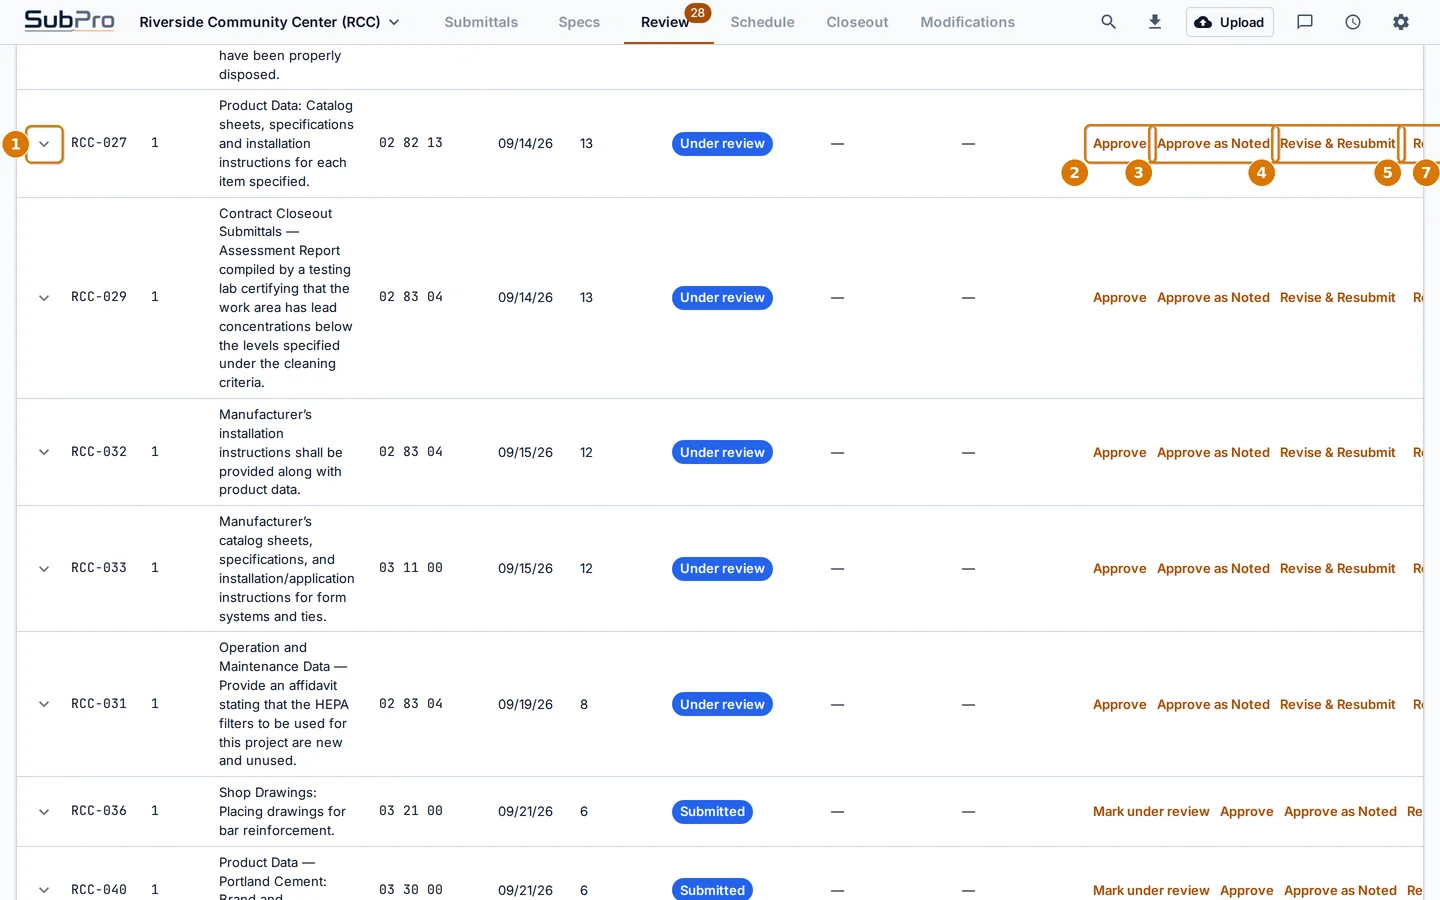 Response actions on a row under review
- 1Open the history
- 2Approve
- 3Approve as Noted
- 4Revise & Resubmit
- 5Reject
- 6Not Reviewed, for a return without action
- 7Acknowledge Receipt, for record only rows
-
Set the response date, add the reviewer's notes, and confirm.
Some moves need a reason and the confirm button waits for it. Attach the returned copy afterward with Attach returned copy so the stamped page stays with the row.
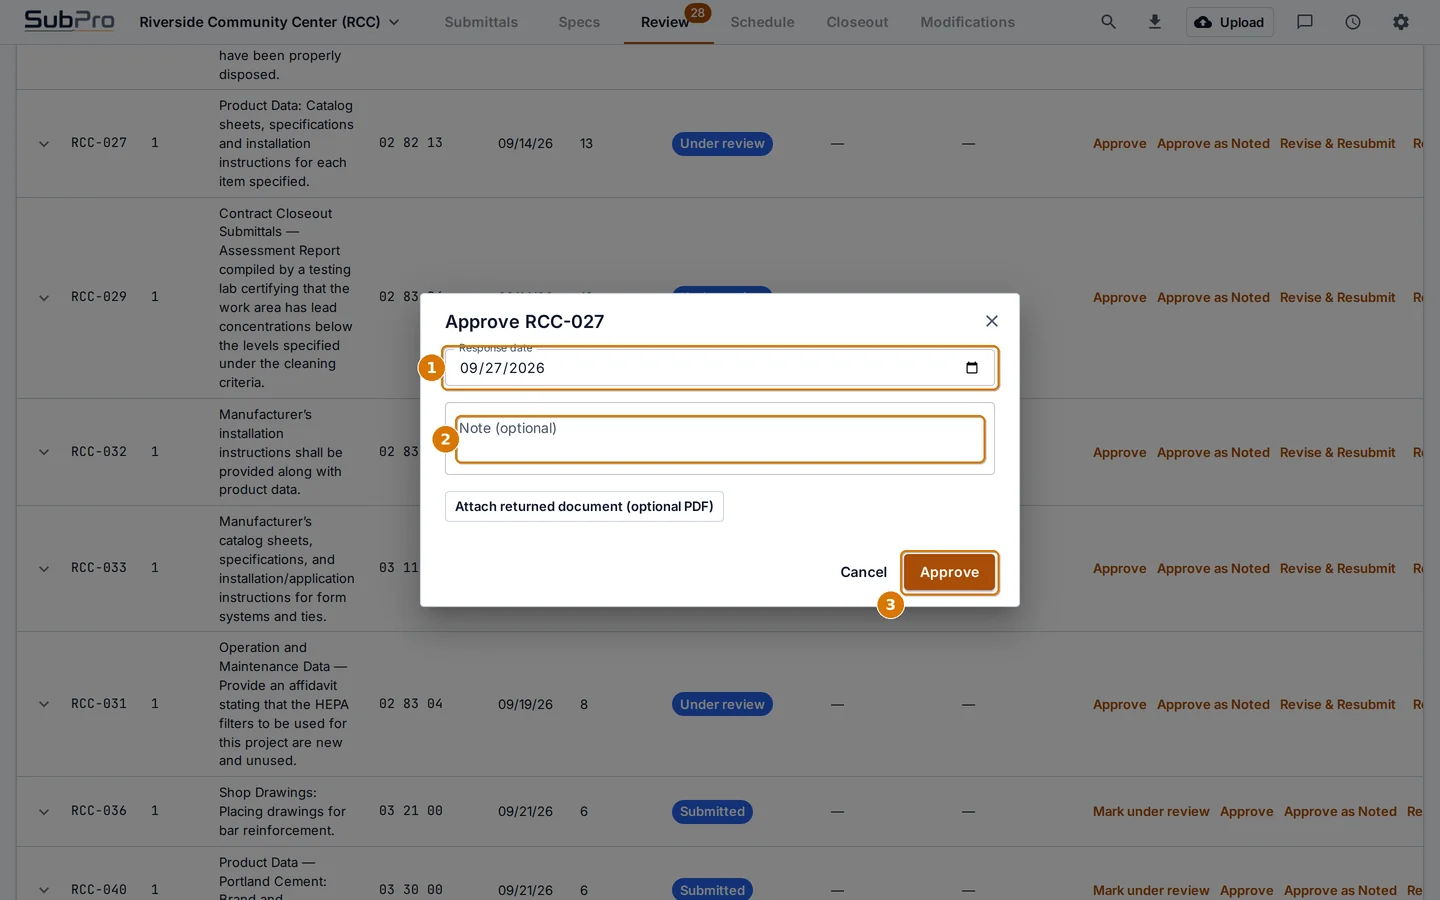 Recording an approval
- 1The date on the reviewer's return
- 2Notes from the return
- 3Confirm
Resubmittals.After Revise & Resubmit, fix the row, build the submittal again and send it. The revision number goes up, the cycle count goes up, and the old cycle stays in the history.
Chapter 15Schedule and lead times
SubPro works backward from the construction start: need on site, minus lead time, minus review time, gives the date you must submit by.
-
Open the Schedule tab, check the two dates, and click Auto-schedule.
Every row gets three dates: submit by, approval by and need on site. Rows that are already late or at risk are flagged, and Risk first sorts them to the top.
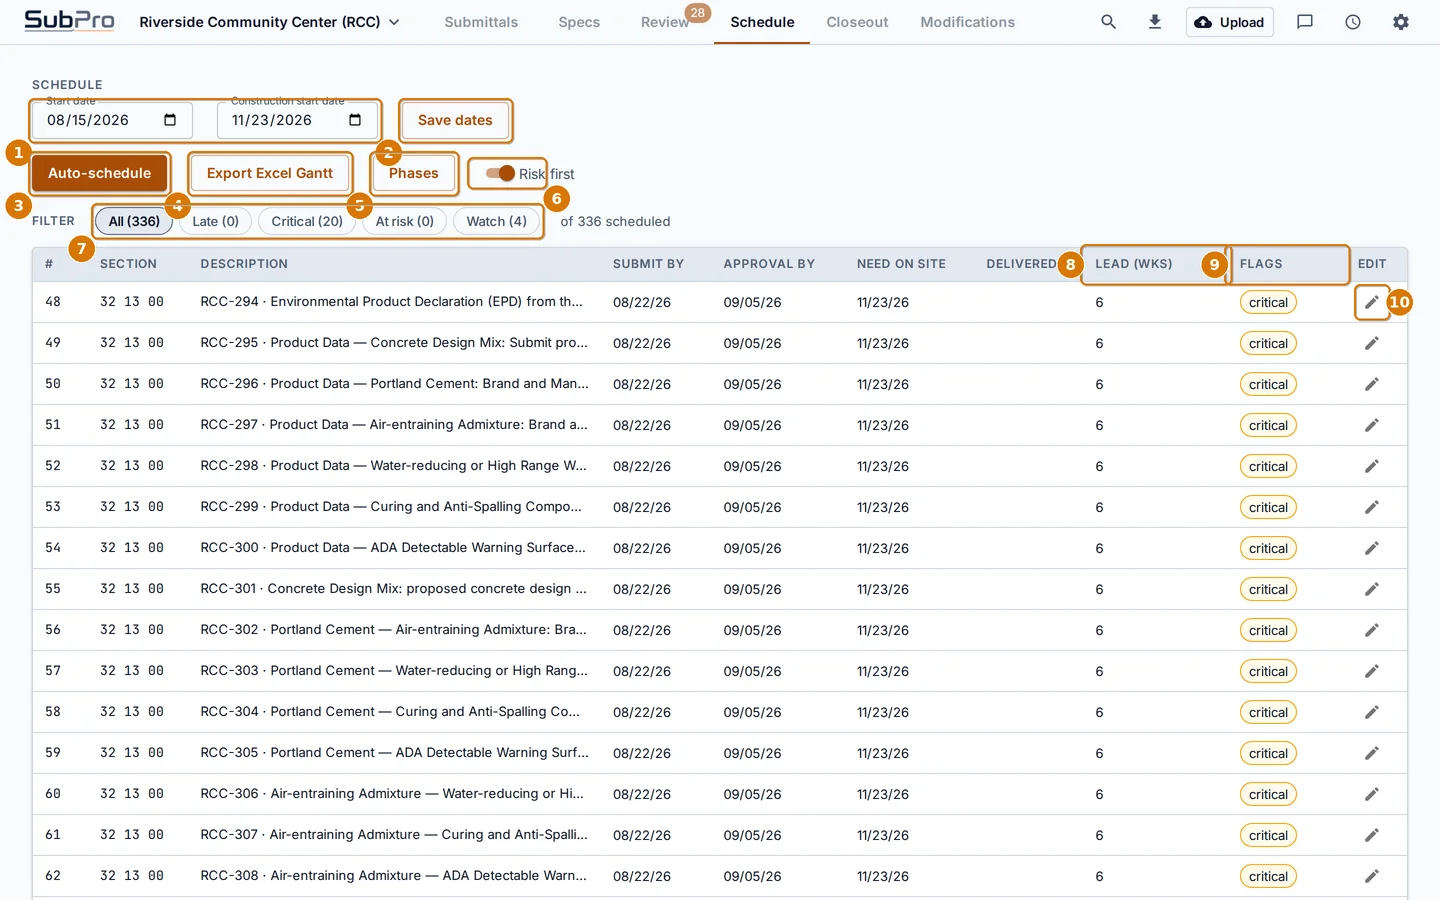 The Schedule tab
- 1Project start and construction start
- 2Save changed dates
- 3Auto-schedule every row
- 4Export an Excel Gantt chart
- 5Phases: split the job into phases with their own start dates
- 6Risk first sorting
- 7Filters: late, critical, at risk, watch
- 8Lead time in weeks
- 9Risk flags
- 10Edit one row's lead time or dates
-
Adjust lead times where you know better: click the pencil on a row, or open the lead times table from the top bar.
The table holds a default lead time per product category. SubPro seeds it with typical values. Edit a category and every row in that category picks up the change on the next Auto-schedule.
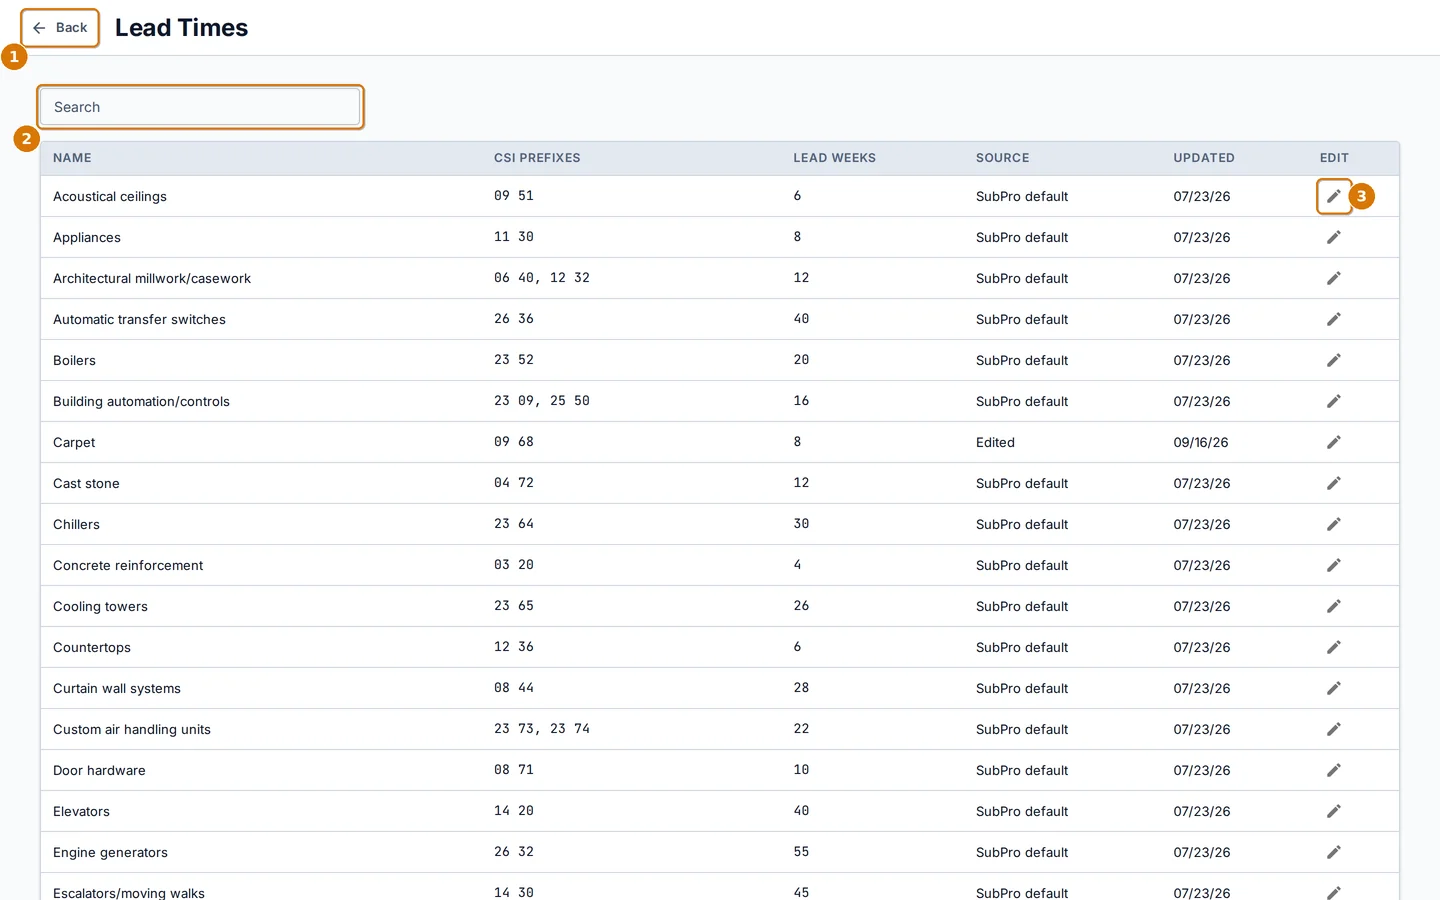 Lead times
- 1Back to the project
- 2Search categories
- 3Edit a category's weeks
Chapter 16Closeout and warranties
Closeout items (O&M manuals, training, warranties, spare parts) are due against a milestone rather than the construction start. The Closeout tab keeps them together.
-
Open the Closeout tab, set the four milestone dates, and click Save milestones.
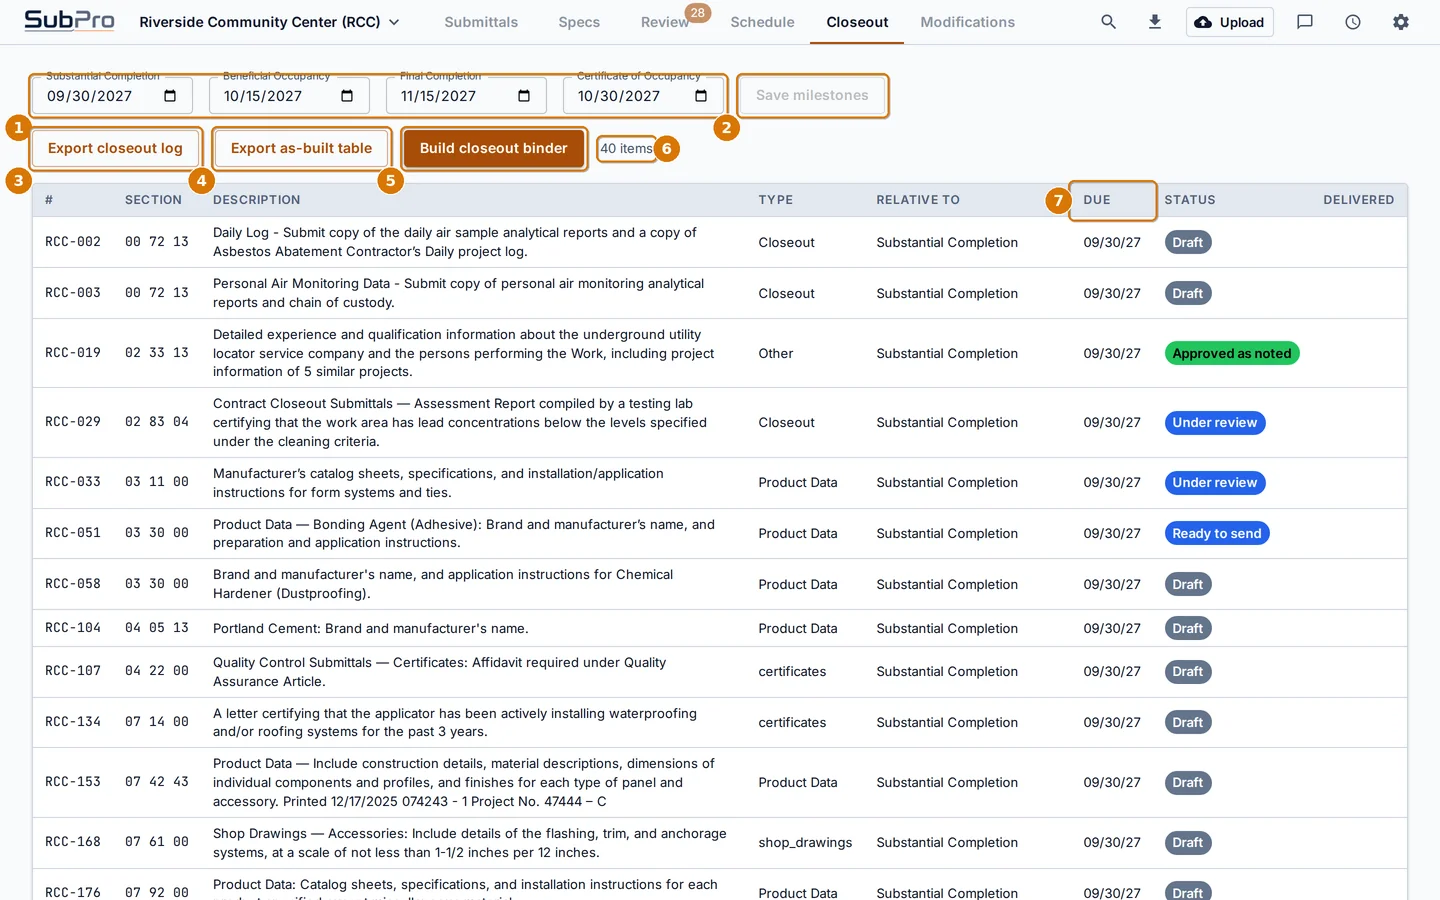 The Closeout tab
- 1Substantial completion, beneficial occupancy, final completion, certificate of occupancy
- 2Save the milestones
- 3Export the closeout log
- 4Export the as built table
- 5Build the closeout binder: one PDF of every closeout document
- 6How many rows are closeout items
- 7Each row is due relative to a milestone
-
Scroll down to Warranties. Click Seed from register to create one warranty per manufacturer, or Add warranty for one at a time.
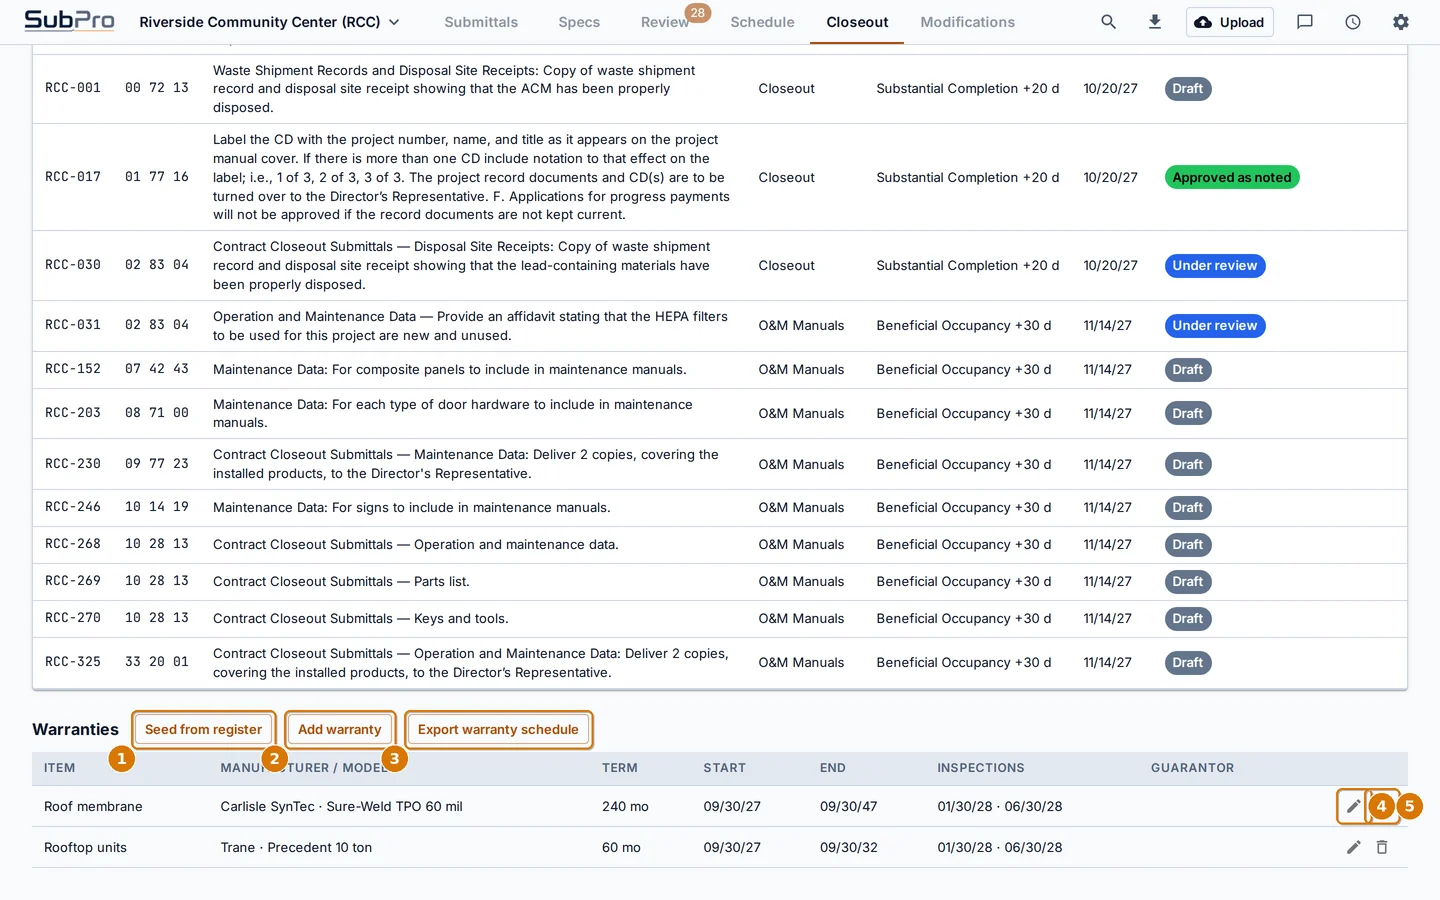 Warranties
- 1Seed warranties from the manufacturers in the log
- 2Add a warranty by hand
- 3Export the warranty schedule
- 4Edit a warranty: item, manufacturer, model, term, start basis
- 5Remove a warranty
Chapter 17Modifications and revisions
When the design team issues an ASI, addendum or bulletin, record it here. SubPro reads the reissued section, shows what changed, and lets you accept the changes row by row.

The Modifications tab
- 1Export the modification log
- 2Add a modification
- 3Expand to see the rows it touches
- 4Kind and number, title, issued date, sections, rows pending, status and attached PDF
- 5Rows still waiting on a decision, out of rows touched
- 6Open until every touched row is decided
- 7Run section diff, available once a PDF is attached
- 8Edit
- 9Remove
-
Click Add modification and fill in what the design team sent.
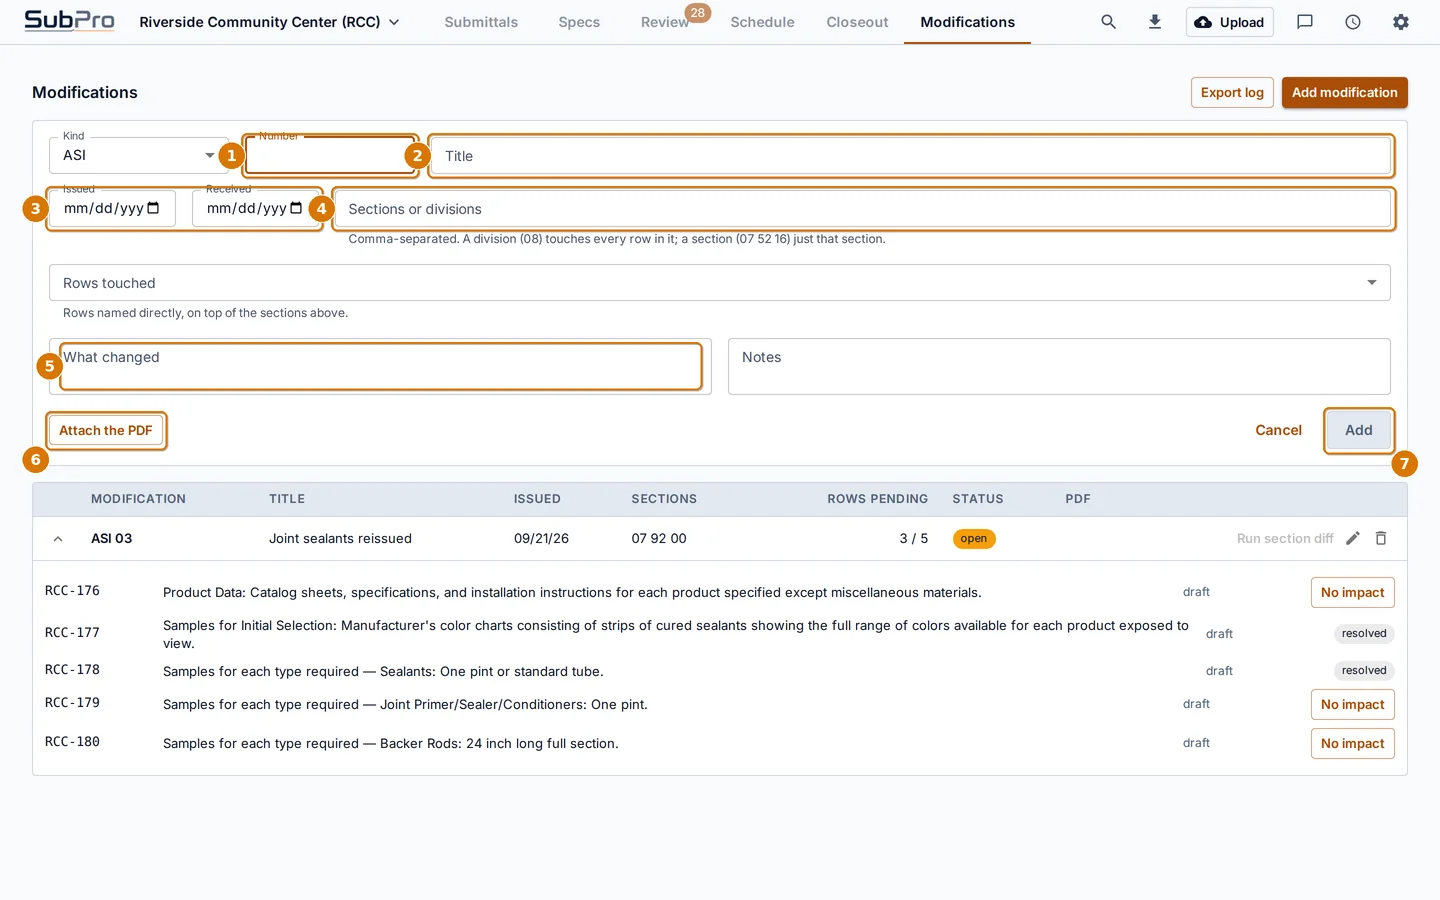 Add modification
- 1Number, for example 03
- 2Title
- 3Issued and received dates
- 4Affected sections, comma separated
- 5Description
- 6Attach the PDF
- 7Add
-
Expand the modification and decide each touched row.
Mark a row No impact if the change does not affect that submittal. Rows with a real change need a decision after the diff runs.
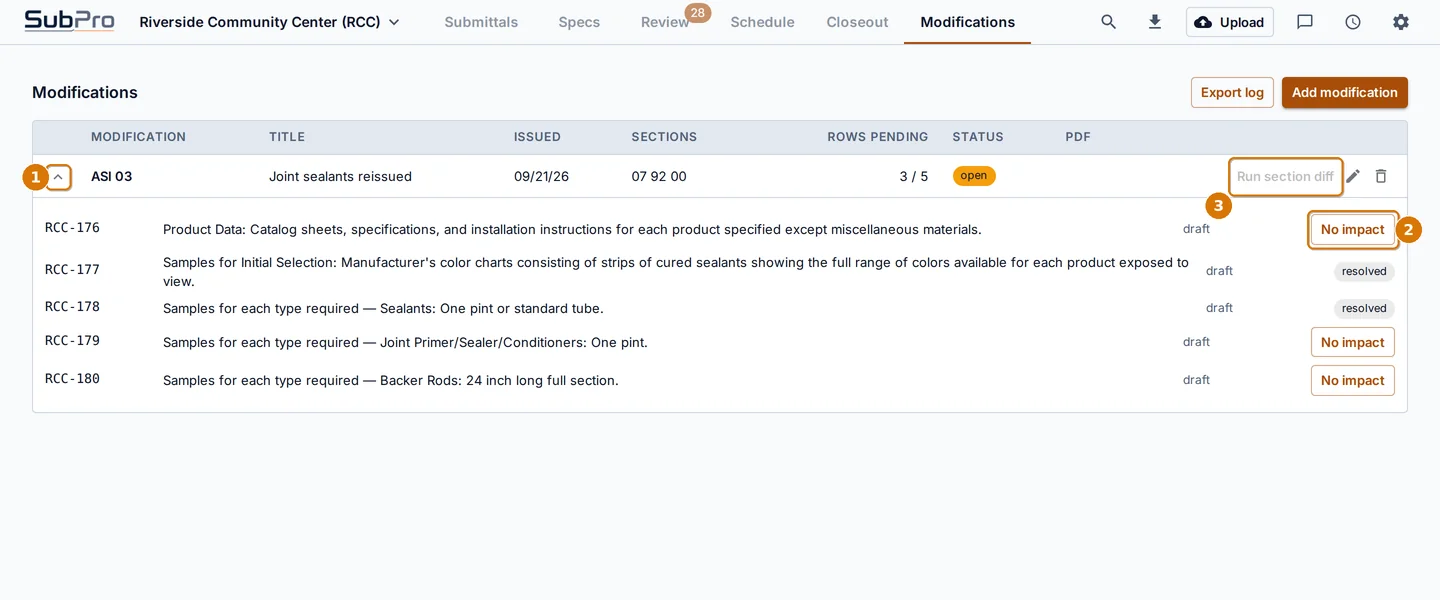 Rows touched by the modification
- 1Expand or collapse
- 2No impact clears the row
- 3Run section diff once a PDF is attached
-
With the PDF attached, click Run section diff, then review the changes in the Specs tab.
SubPro reads the reissued section and lists rows added, modified and removed. Accept or reject each change, then click Apply. Nothing is saved until you apply. Rows already approved are never changed silently, and a row that replaces an old one records a Supersedes link.
A whole new book?If the whole spec book is reissued, use Upload revision on the Specs tab instead. SubPro compares the full book and shows the same change list.
Chapter 18Chat, search and export
Ask the chat
The chat answers questions about the open project in plain language and cites the page or the row it drew from. Switch the scope between the spec book and the submittal log.
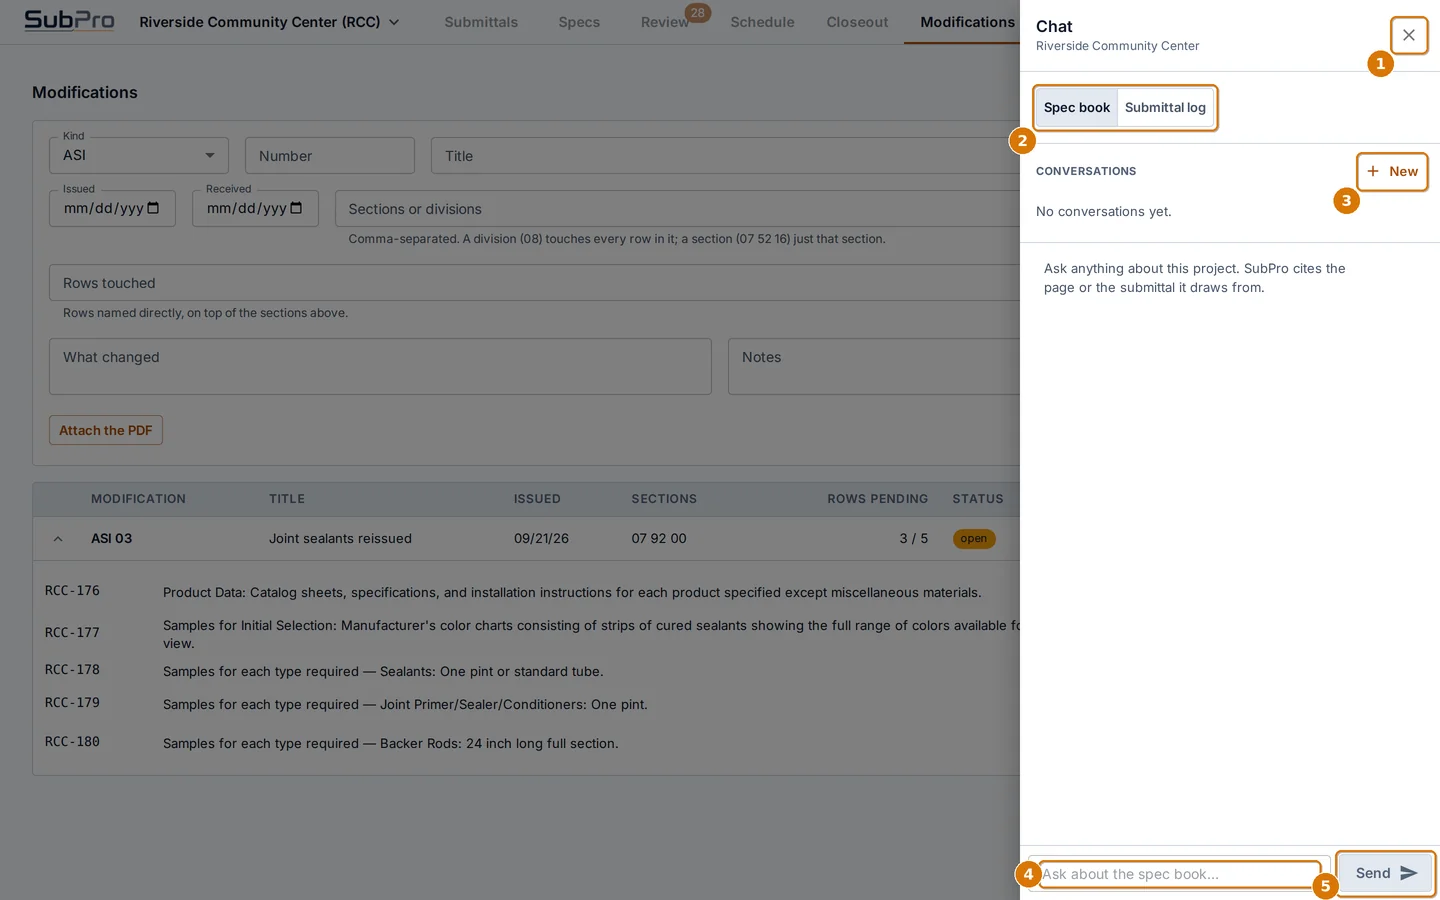
The chat drawer
- 1Close
- 2Scope: the spec book, or the submittal log
- 3Start a new conversation
- 4Type a question
- 5Send
Questions that work well: "Which sections require samples?", "What is still unapproved in Division 8?", "Where does the book name Sherwin Williams?".
Search everything
Press Ctrl+K anywhere, or click the magnifier. Results cover projects and submittals. Press Enter on a result to jump to it.
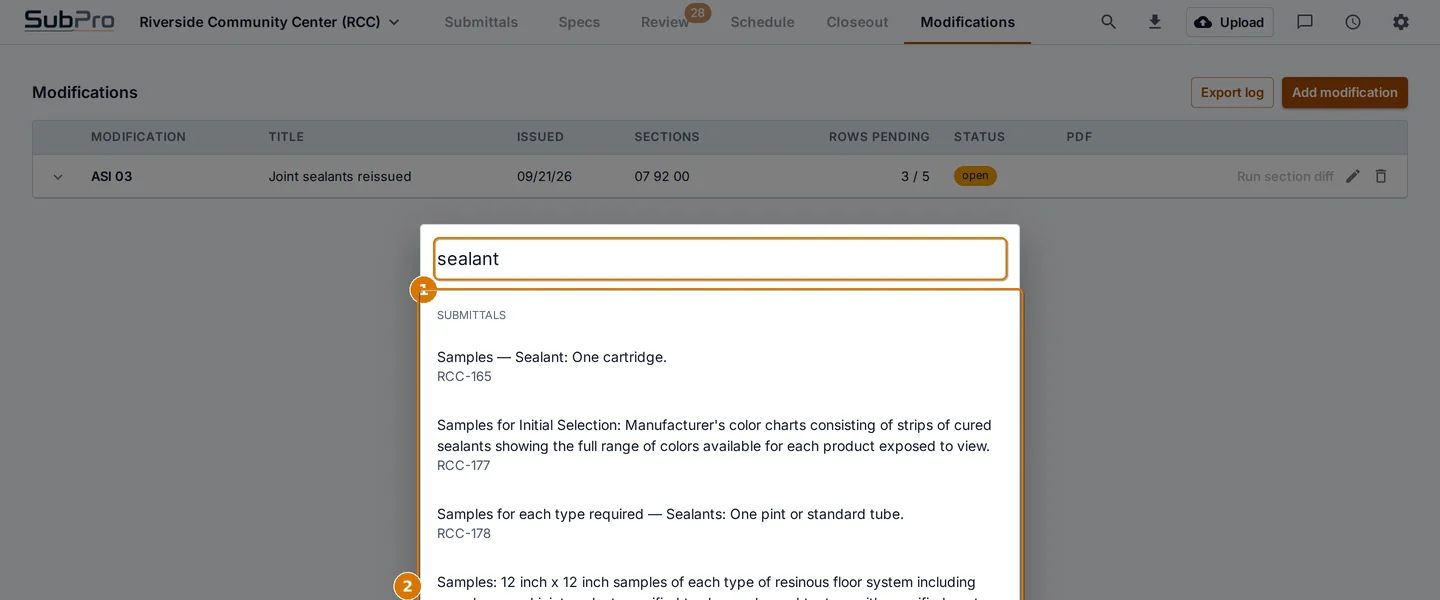
Search
- 1Type what you are looking for
- 2Results update as you type
Export the log
Click the download icon in the top bar and choose CSV or Excel. The file is sorted by division and section and carries status, source page, manufacturer and product columns, flags and review states. It drops straight into Procore, Bluebeam, SharePoint or plain Excel.
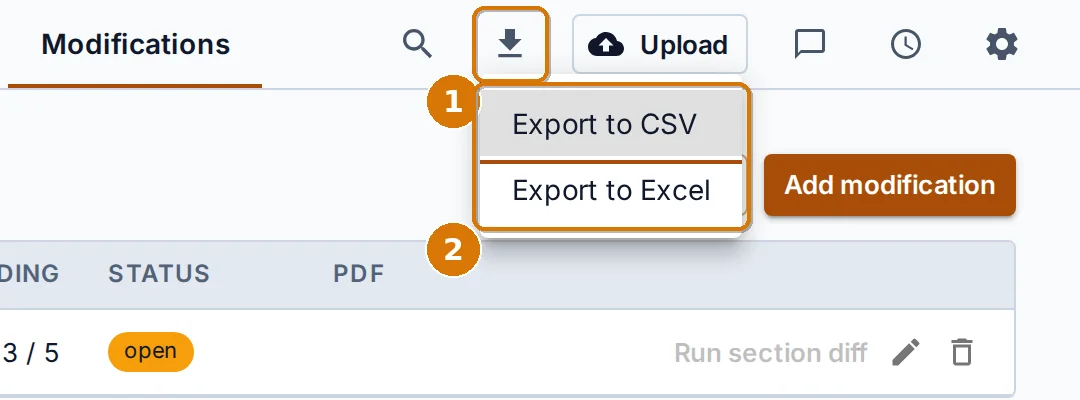
Export
- 1The export button
- 2CSV or Excel
Chapter 19Settings
Open Settings from the gear in the top bar. The top half is what most people touch. Show advanced opens the rest.
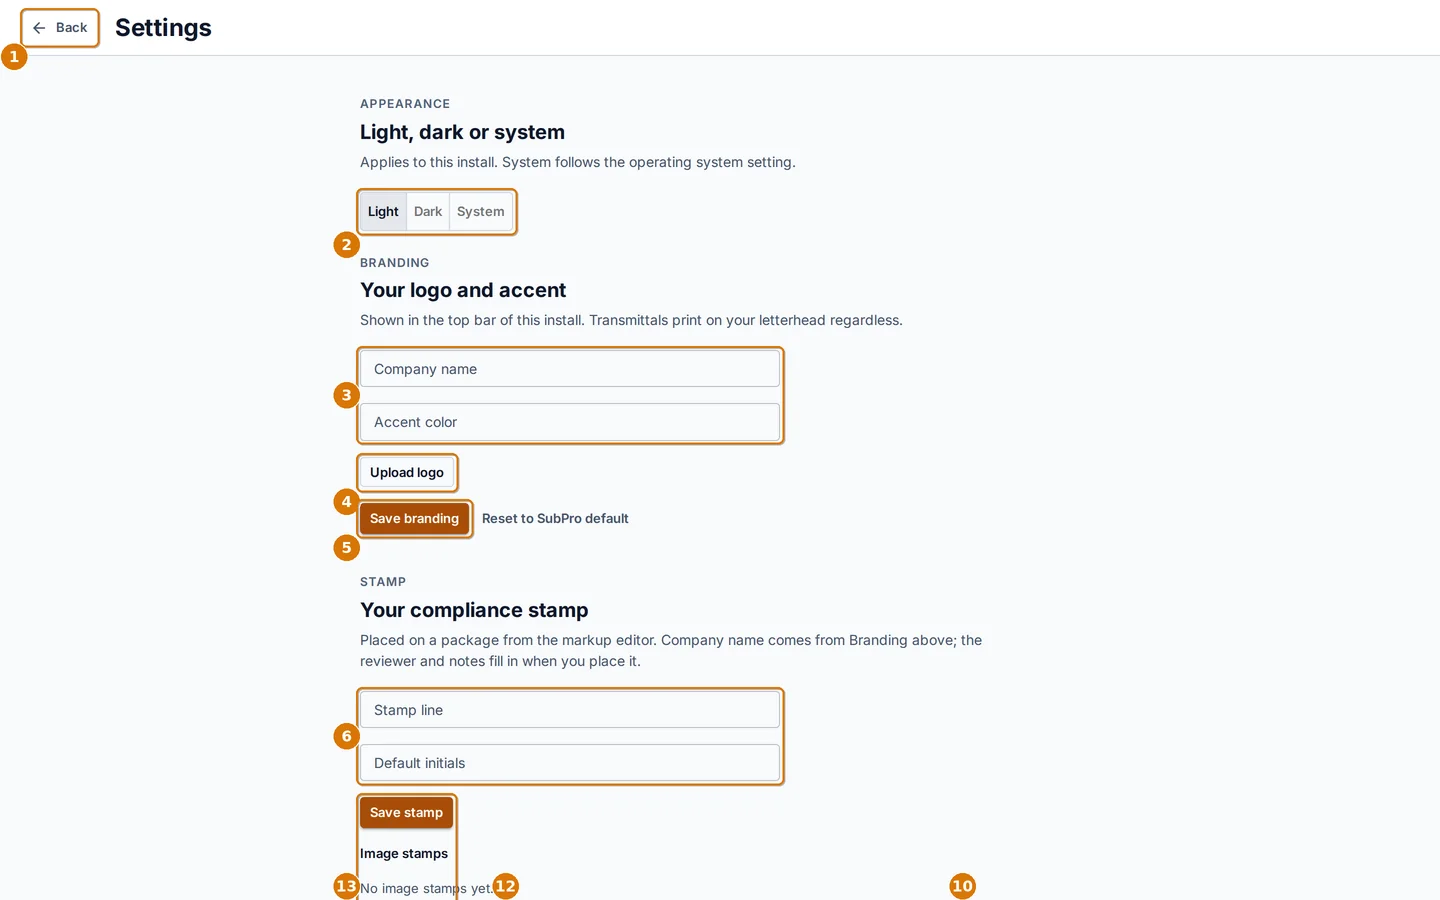
Settings
- 1Back to where you were
- 2Light, dark or follow Windows
- 3Company name and accent color, used on screens and stamps
- 4Upload your logo
- 5Save branding
- 6Stamp line and default initials for the company stamp
- 7Save the stamp, or add another stamp
- 8Where SubPro sends spec books for reading. Leave it as set
- 9Your API key
- 10Reveal the key to check it
- 11Test the connection
- 12Save changes
- 13Show advanced
Advanced
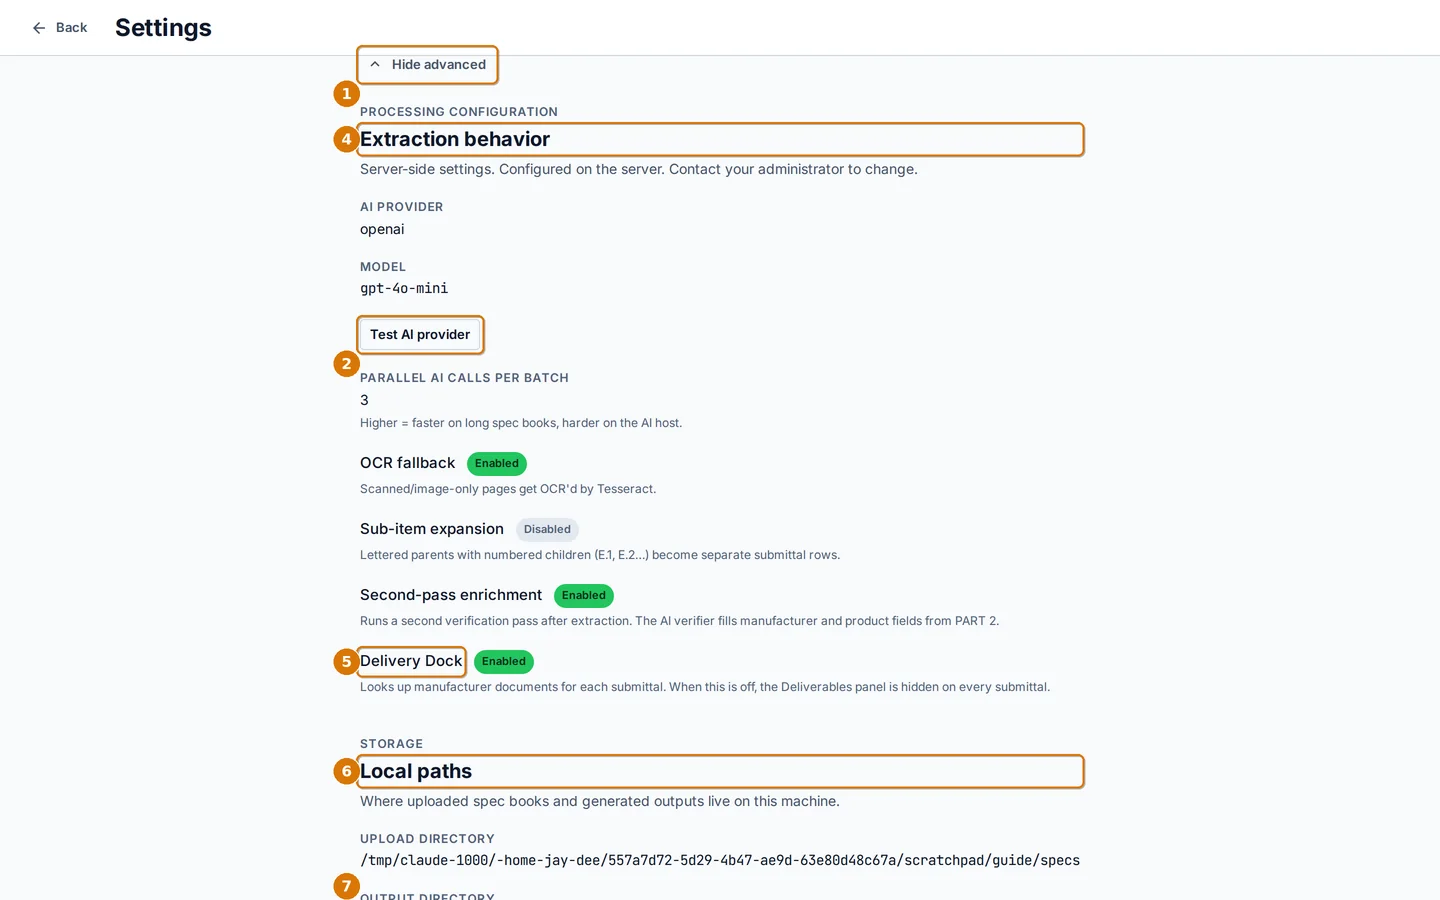
Advanced settings
- 1Hide advanced
- 2Test the chat provider
- 3Which provider answers the chat
- 4Extraction behavior, set on the server. Read only
- 5Delivery Dock, the manufacturer document service
- 6Where files live on this computer
- 7AI chat settings
Connect your Microsoft 365 mailbox once. SubPro sends from that mailbox and never stores your password. Your IT admin may need to approve the connection the first time.
Procore
Connect a Procore company and project to push approved submittals across. The SubPro app must be installed on your Procore company first.
Extraction behavior
Shows the reading options your account has: OCR for scanned pages, sub item expansion, second pass enrichment. These are set on the server.
Local paths
Where uploads and rendered files live on this computer, and the upload size limit.
Chapter 20Keyboard shortcuts
| Keys | Where | What happens |
|---|---|---|
| Ctrl+K | Anywhere | Open search |
| Esc | Any dialog or drawer | Close it |
| Ctrl++ / Ctrl+- | Anywhere | Zoom the whole app in or out |
| V T R E L A C P H S I | Markup editor | Select, text, rectangle, ellipse, line, arrow, cloud, pen, highlight, company stamp, image stamp |
| Delete / Backspace | Markup editor | Delete the selected mark |
| Ctrl+Z / Ctrl+Shift+Z | Markup editor | Undo, redo |
| + / - | Markup editor | Zoom the page |
Chapter 21Troubleshooting
| What you see | What it means and what to do |
|---|---|
| The setup says the key is invalid | The key was mistyped or is not active. Paste it again from the welcome email. If it still fails, write to support and ask for a fresh key. |
| Could not connect on the last setup step | The computer cannot reach the SubPro service. Check the internet connection and any VPN, then click Back to API key and try again. |
| An upload sits in processing for a long time | Big books take longer. The job keeps running even if you close SubPro. If nothing has changed after an hour, close and reopen the project. The log syncs on its own when the job completes. |
| A section warning after processing | One section hit a reading limit and was retried. Spot check that section in the viewer. The warning exists so nothing is left out silently. |
| Blank manufacturer or product on many rows | The spec book did not name them, which is common in general sections. Rows that do name them are filled. Add the rest from Edit as you learn them. |
| Deliverables stuck on Researching | The catalog is still locating the document. Uncommon products take longer. Attach your own cut sheet and send. The submittal does not wait. |
| No PDF available for this submittal | The viewer's copy of the book lives on the computer where it was uploaded. Upload the book again on this computer. The log returns at once. |
| Create Submittal asks for a template | This project has no transmittal sheet yet. Follow chapter 11. It takes two minutes and you do it once per project. |
| Email fails to send | The message names the failing step. Most often the Microsoft 365 mailbox permission changed. Ask your IT admin, or click Save As and send the PDF from your own mail client. |
| Send is gray with a warning box | Read the warning. Fix it, or tick "I have checked these" to send anyway. Your choice is recorded in the audit log. |
| A row I removed still shows in an old export | Exports are snapshots. Export again. Removed rows leave the log, the chat and every new export. |
| Days out shows a dash | The row has no Submitted entry in its history. Use Mark as submitted with the real date. |
Still stuck? Write to support@sub-pro-ai.com with the project name and a screenshot.
Chapter 22Questions people ask
Is the log a final answer?
No. It is a first pass built for a human check. Rows carry confidence scores and flags so you spend your time on the uncertain ones. Use the Needs check filter after every upload.
Where does my spec book go?
To the SubPro service for reading, then it is deleted there. The extracted rows stay. The viewer's copy stays on your computer only.
Can two people work the same project?
The log lives on one computer. For a shared log, export to Excel or push to Procore. A shared workspace is on the roadmap.
How are submittal numbers assigned?
In CSI order, by the project number prefix. The screen shows section, ordinal and revision. Combining rows or applying a revision can renumber rows that were never sent. Sent numbers are protected and SubPro warns you before touching them.
What is a class?
Action submittals need the reviewer's approval. Informational ones are for record only and get no approval clock. Closeout items are due against a milestone rather than the construction start.
What counts against my allowance?
Each spec book read and each modification diff. Re-uploading a book SubPro has already read is free. Building, marking up and emailing submittals is free.
Can I change the transmittal after saving?
Yes. Change the row or the attachments and click Save package again. Then Mark up if you need to. Each save replaces the file in the project folder.
Does SubPro send anything on its own?
Never. Nothing leaves the computer until you click Send, and every send is recorded in the audit log with who sent it and any warning you overrode.
Chapter 23Glossary
- Spec book
- The project manual. The PDF of specifications you upload.
- CSI section
- The six digit MasterFormat number for a section, such as 03 30 00 Cast in Place Concrete. Divisions are the first two digits.
- Submittal
- One item the spec book requires you to submit for review: product data, shop drawings, samples, certificates, reports, manuals, warranties.
- Submittal log
- The full list of required submittals for a project, with status. Also called the register.
- Transmittal
- The cover sheet that goes on top of a submittal. SubPro prints it on your template.
- Submittal package
- The transmittal plus the cut sheets and manufacturer documents, merged into one PDF. One package is one submittal.
- Cut sheet
- A manufacturer's product data sheet.
- Basis of design
- The manufacturer and product the spec book names as the standard. Substitutions are measured against it.
- Deviation
- A submitted product that differs from the spec book. Must be described on the transmittal.
- Ball in court
- Who the row is waiting on: you, the reviewer, or closed.
- Cycle
- One send and return. A resubmittal starts cycle 2.
- Days out
- Days since the submittal was sent, while it is waiting on the reviewer.
- Lead time
- Weeks from approval to material on site, by product category.
- Deliverables
- The manufacturer documents a submittal needs. SubPro finds them in its catalog.
- Modification
- An ASI, addendum, bulletin or change order that alters the spec book after award.
- Closeout
- The documents due at the end of the job: O&M manuals, warranties, training, spare parts, as builts.
- Allowance
- The number of spec books your plan reads per month.
Screens in this guide show a sample project with example data. For help, write to support@sub-pro-ai.com.